Documentation
BeBuddy - Multipurpose Community & Membership WordPress Theme
Thank you so much for purchasing our item from themeforest.
- Version: 1.0
- Author: thunder-team
If you have any questions that are beyond the scope of this help file, Please feel free to email via Item Support Page.
Requirements
Before installing and using this theme, ensure your server and WordPress setup meet the following minimum requirements. These specifications help ensure optimal performance, security, and compatibility.
- WordPress Version:
- Minimum: WordPress 5.6+
- Recommended: Latest version
- PHP Version:
- Minimum: PHP 7.4
- Recommended: PHP 8.0+ for better performance and security.
- Database Requirements:
- MySQL 5.7+ or MariaDB 10.3+
- Server Requirements:
Memory Limit:At least 512MB (Recommended: 1GB+)Max Execution Time:300 seconds or more.Post Max Size:128MB or higherUpload Max Filesize:64MB or higher
Recommended Hosting Providers
For the best performance and compatibility, we recommend WordPress-optimized hosting providers:
- Hostinger (LiteSpeed servers, super fast)
- SiteGround (managed WordPress, built-in caching)
- Bluehost (beginner-friendly)
Installation
This section will guide you through installing WordPress (if you haven't already) and setting up the theme on your website. Follow the steps below for a smooth installation process.
WordPress Installation
Before installing the theme, you must have a working WordPress installation. If you haven’t installed WordPress yet, follow these steps:
Method 1: One-Click Installation (Recommended for Beginners)
Most hosting providers offer a one-click WordPress installation through cPanel or a similar dashboard.
- Log in to your hosting account.
- Locate Softaculous, WordPress Installer, or a similar tool.
- Click Install WordPress and follow the on-screen instructions.
Method 2: Manual Installation
Check the detailed step by step installation tutorial by wpbeginner
Theme Installation
First, you need to download the theme from ThemeForest.
- Log in to your ThemeForest account, navigate to Account >> Downloads, and find the BeBuddy theme.
- Click the Download button. A popup will appear with several options.
- Select either All files & documentation or Installable WordPress file only to download the BeBuddy theme.
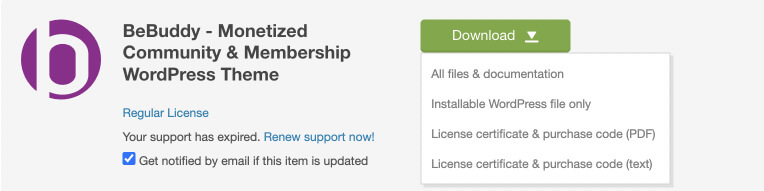
If you downloaded All files & documentation, unzip the folder. Inside, you will find the following folders: extras, installable-themes, licensing, and plugins, along with the files change-logs.txt and docs.html. Inside the installable-themes folder, you will find the bebuddy.zip file. This is the file you need to upload for theme installation.
Method 1: Upload via WordPress Admin (Recommended)
- Log in to your WordPress Admin Panel.
- Go to Appearance > Themes > Add New.
- Click Upload Theme and select the downloaded theme ZIP file (
bebuddy.zip). - Click Install Now, then Activate once the installation is complete.
Method 2: Upload via FTP
- Extract the
bebuddy.zipfile on your computer. - Connect to your server using an FTP client (e.g., FileZilla).
- Navigate to:
/wp-content/themes/ - Upload the extracted theme folder (
bebuddy.zip). - Log in to WordPress and go to Appearance > Themes.
- Locate the theme and click Activate.
Important Note: If you upload the wrong file, WordPress may display the following error: "The package could not be installed. The theme is missing the style.css stylesheet." This occurs when you upload the full package instead of the installable theme file. To avoid this, make sure you select the correct file as instructed above.
Setup Wizard
After successfully installing and activating the theme, you will be automatically redirected to the theme setup wizard—a simple, step-by-step process to get your site up and running quickly with minimal effort.
Alternatively, you can manually launch the wizard by navigating to Appearance > Theme Setup.
Let's get started with the wizard screens!
Flexible & Re-runnable: The setup wizard can be run multiple times. Start with a homepage and basic features, then return later to add more functionality or switch to a different homepage as your site grows. You're not locked into your initial choices!
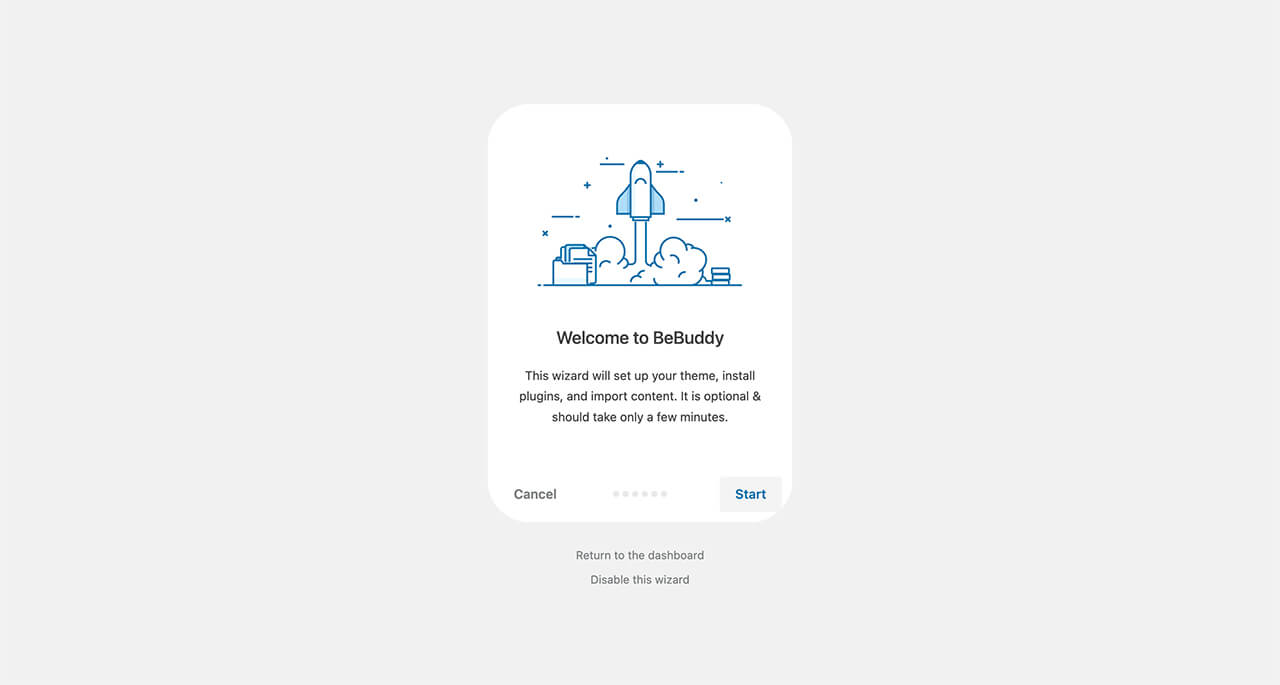
1. Welcome
Welcome to the BeBuddy Setup Wizard! This guided process will help you set up your theme quickly and easily.
Click the Start button to continue.
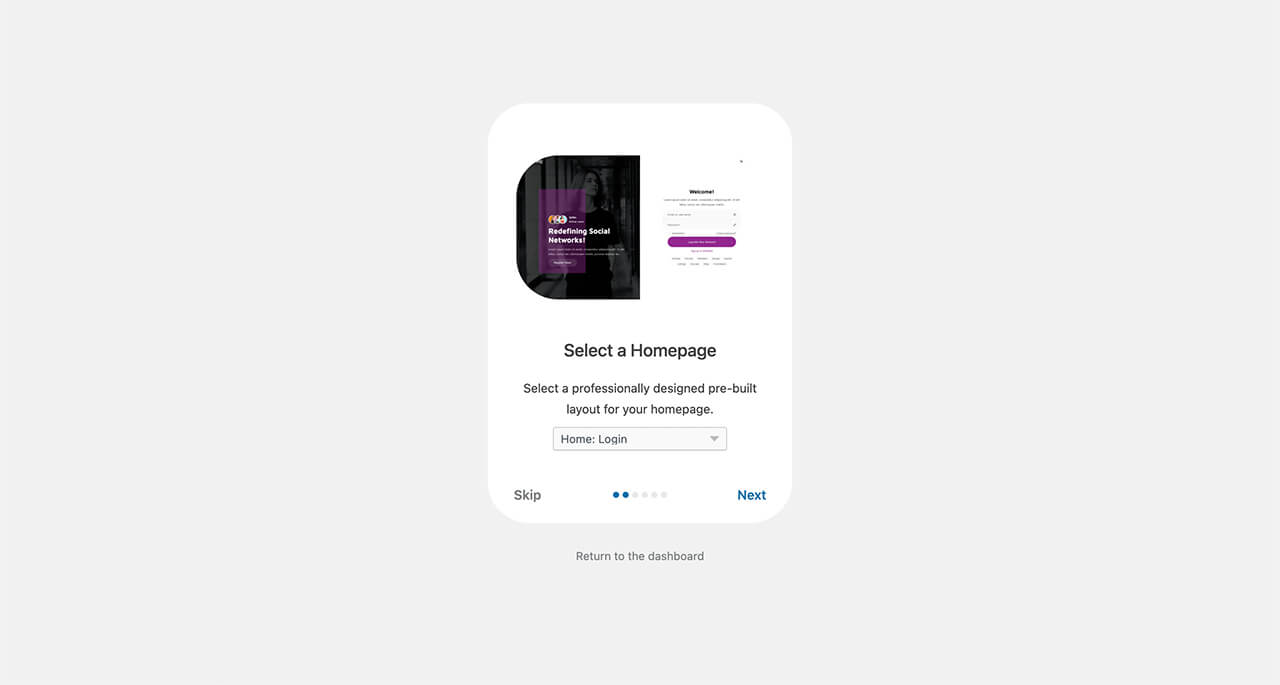
2. Select a Homepage
Choose your desired homepage for your website. Once selected, click the Next button to proceed.
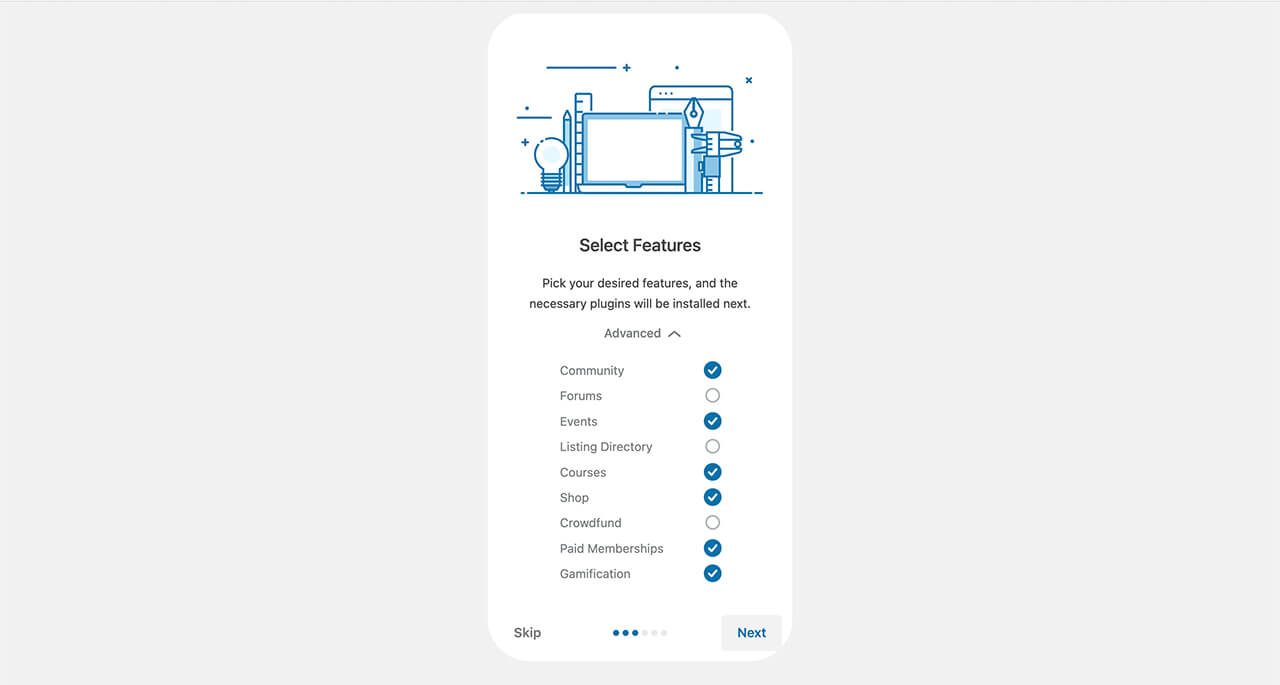
3. Select Features
Choose the features you want to include on your website. Based on your selected homepage, the wizard automatically preselects the recommended features. You can add or remove features by clicking the Advanced link. Once done, click the Next button to continue.
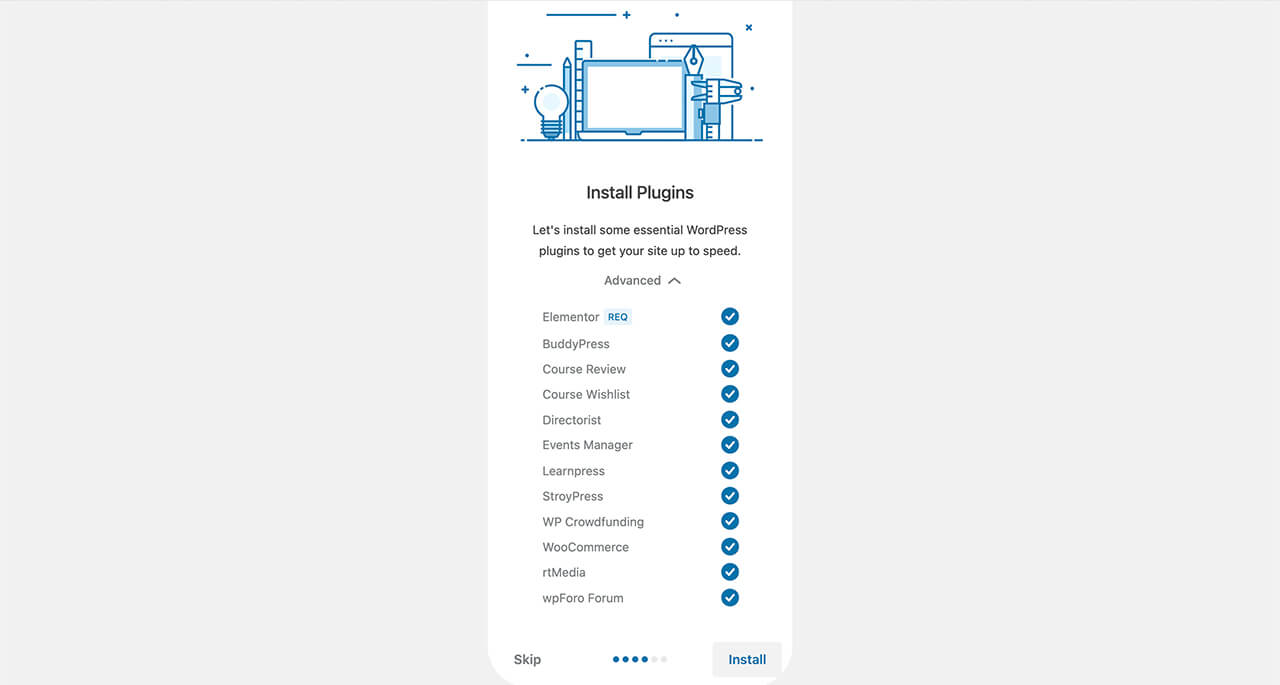
4. Install Plugins
In this step, the required plugins for your selected homepage and features will be installed automatically. Click the Advanced link to view the list of plugins. Then, click the Install button to proceed.
If any plugin fails to install, go back using your browser's back button (Chrome recommended) and try again.
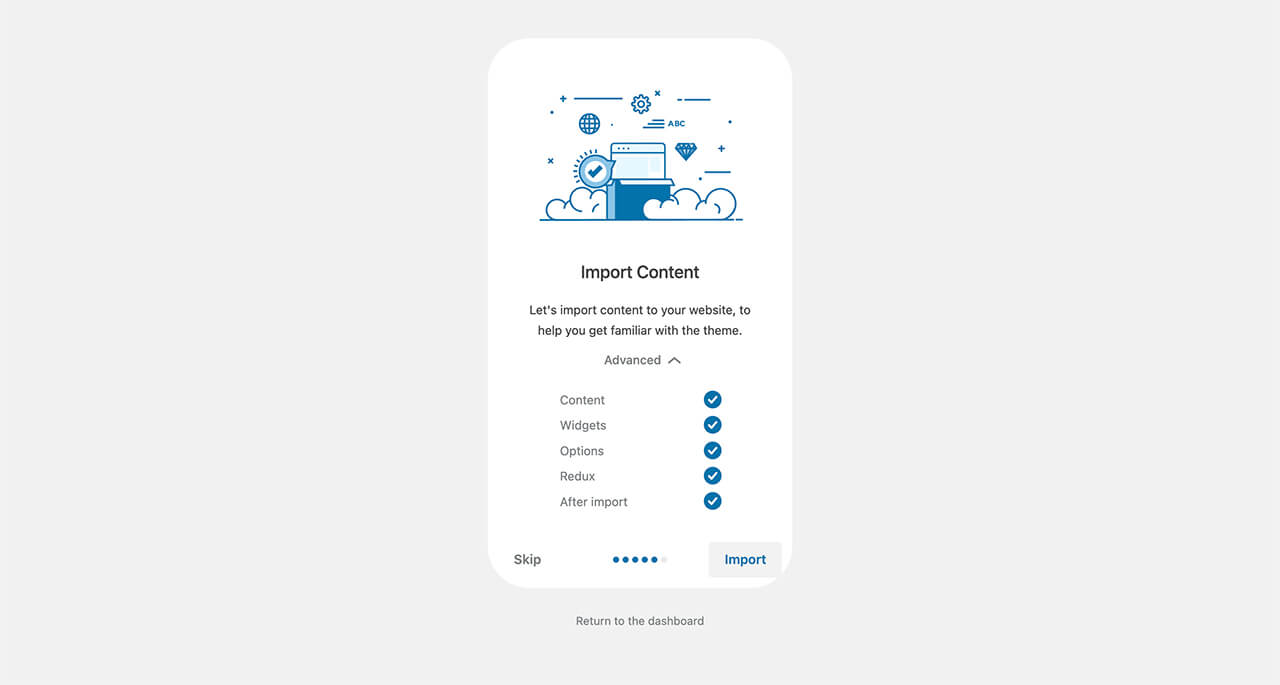
5. Import Content
Click the Import button to populate your website with demo content, making it look like the theme demo.
Please Note: This process does not import external memberships levels, members, groups, or forums. You will manage your own authentic members and community structures directly on your site.
Important: The demo import may take up to 15 minutes depending on your server capacity. This time is needed to ensure everything works correctly. Please be patient and do not close your browser during this process. If something fails to import, you can rerun the wizard and it will re-import the failed media. If you are experiencing any issues, please contact our support team for assistance. We'll promptly respond to your query.
6. Done!
Setup is complete! Your website is now loaded with demo content. You can view your site or customize its branding and settings to match your needs.
For further customization, please refer to the rest of the documentation for detailed instructions on how to personalize your website's design, layout, and functionality.
Need to Start Over? If something goes wrong or you want to try a different configuration, you can rerun the wizard anytime by navigating to wp-admin > BeBuddy > Setup Wizard. There's no limit to how many times you can run it.
Common Questions
max_execution_time and memory_limit) or contact your hosting provider.
Theme Update
Keeping your theme up to date is essential for security, performance, and access to the latest features. The BeBuddy theme can be updated easily through the Envato Market plugin, which ensures you always have the latest version of the theme.
To set up automatic updates, follow these steps:
- Ensure the Envato Market plugin is activated. If the plugin is not already activated, you can install and activate it by going to wp-admin > Appearance > Install Plugins. If you can't find the plugin, download it from Envato Market Plugin, then install and activate it.
- Once the plugin is activated, navigate to Dashboard > Envato Market and follow the on-screen instructions to complete the setup.
Important: Always backup your site before updating.
Theme Customization With Child Theme
Do You Need a Child Theme?
Before we dive into child themes, let's clarify when you actually need one:
You DON'T Need a Child Theme For:
- Changing theme settings - Colors, fonts, layouts via Appearance > Customize
- Configuring plugins - BuddyPress, WooCommerce, forum settings, etc.
- Adding content - Pages, posts, menus, widgets
- Using page builders - Elementor customizations
You DO Need a Child Theme For:
- Custom CSS code - Adding your own CSS beyond theme options
- Custom PHP code - Modifying template files or functions
- Overriding theme files - Customizing specific theme templates
- Adding custom functions - Extending theme functionality with code
What is a Child Theme?
A child theme is a separate theme that inherits all the functionality and styling from the parent BeBuddy theme. When you make code-level customizations in a child theme, your changes are preserved when the parent theme is updated.
Good News: The BeBuddy Setup Wizard automatically creates and installs a child theme for you during the initial setup! If you skipped it, you can rerun the wizard anytime.
Our Recommendation
Always Use a Child Theme! Even if you don't plan to customize any code right now, we strongly recommend keeping the child theme active. Here's why:
- Zero Performance Impact - Child themes don't slow down your site
- Future-Proof - You might need custom code later, and it's already set up
- Safe Updates - Your site stays protected even if you accidentally add custom code
- No Extra Cost - It's already created for you by the setup wizard
- Professional Best Practice - Recommended by WordPress developers worldwide
Bottom line: Keep the child theme active. There's absolutely no reason not to, and it gives you peace of mind for the future.
Learn more about child themes and how to use them: WordPress Child Theme Documentation
Personalization & Customization
Find everything you need to personalize and customize your site here.
Site Identity
Your site identity includes your logo, site title, tagline, and favicon. These elements help establish your brand and make your site recognizable to visitors.

Uploading Your Logo
BeBuddy supports multiple logo variations for different contexts:
- Navigate to Appearance > Customize > Site Identity
- Click Select Logo to upload your main logo
- Click Publish to save your changes
Recommended Logo Dimensions: For best results, use a logo with dimensions of 200px × 60px (width × height). PNG format with transparent background works best.
Site Title & Tagline
Your site title and tagline appear in search results and browser tabs:
- In the same Appearance > Customize > Site Identity panel
- Update Site Title (e.g., "My Awesome Site")
- Update Tagline (e.g., "Connect, Share, Grow Together")
- Click Publish to save your changes
Site Icon (Favicon)
The site icon appears in browser tabs and bookmarks:
- Navigate to Appearance > Customize > Site Identity
- Click Select Site Icon
- Upload a square image (minimum 512px × 512px)
- Click Publish
Common Questions
width and height attributes. Open the SVG file with a text editor (Notepad, VS Code, etc.) and add these attributes to the <svg> tag. Example: <svg width="200" height="60" viewBox="0 0 200 60" xmlns="http://www.w3.org/2000/svg"> <!-- Your logo paths here --> </svg>- Go to wp-admin > Pages > All Pages
- Find and edit your homepage
- Scroll down to the Page Options meta box below the editor
- Replace the BeBuddy logo with your own, or remove it to use the global logo
Note: Page-specific logos should only be used when you want a different logo on that particular page.
Typography
Typography plays a crucial role in readability and user experience. BeBuddy lets you customize fonts for different elements of your site.
Changing Fonts
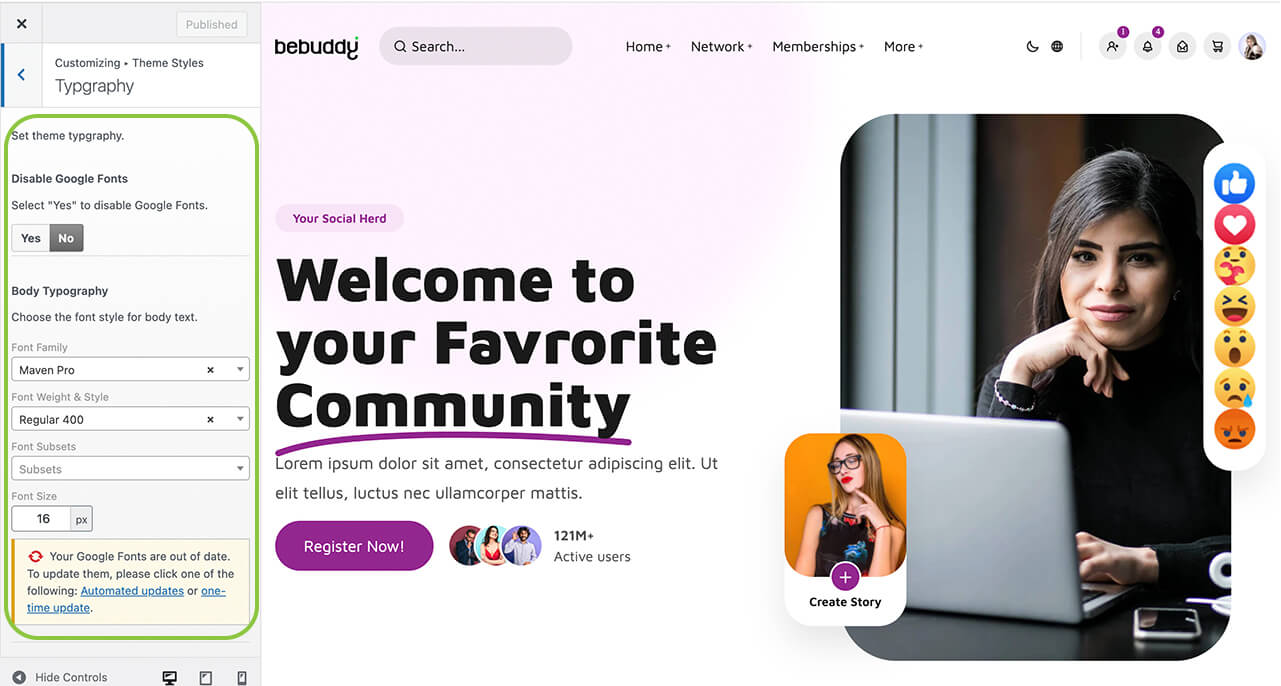
Customize your site's typography through the Customizer:
- Navigate to Appearance > Customize > Theme Styles > Typography
- Choose fonts for different elements:
- Body Typography - Main text throughout the site
- Heading Typography - All headings (H1, H2, H3, etc.). Font sizes automatically adjust based on the body font size
- Adjust font sizes, weights, and line heights
- Click Publish to save
Common Questions
Colors
Customize your site's color scheme to match your brand identity. BeBuddy offers flexible color options that apply throughout your entire site.

Changing Site Colors
You can customize colors through the WordPress Customizer:
- Navigate to Appearance > Customize > Theme Styles > Colors
- Header Colors
- Header Background Color - Background color for the header area
- Header Text Color - Text and link color in the header
- Footer Colors
- Footer Background Color - Background color for the footer area
- Footer Text Color - Text and link color in the footer
- Primary Color
- Primary Color - Your site's main brand color (buttons, accents)
- Color Themes - BeBuddy supports light and dark themes
- Default Theme - Choose between light or dark mode as the default
- Body Background Color - Main background color for your site
- Card Background Color - Background color for UI cards and panels
- Border Color - Color for borders and dividers
- Text Color - Text colors with varying contrast levels (headings, links, body text, muted text)
- Message Colors - Colors for notification and alert boxes
- Info Color - Informational messages
- Success Color - Success confirmations
- Warning Color - Warning alerts
- Error Color - Error messages
- Click on any color to open the color picker
- Select your desired color or enter a HEX code (e.g.,
#FF5733) - Preview changes in real-time
- Click Publish when satisfied
Dark Mode Support
BeBuddy includes built-in dark mode support with the following features:
- Set Default Mode: Choose your site's default color theme at Appearance > Customize > Theme Styles > Colors > Default Theme
- User Toggle: When enabled in header settings, the color switcher will be available to logged-in users, allowing them to switch between light and dark modes
Theme Options
BeBuddy uses the powerful Redux Framework for advanced theme settings. Access comprehensive options to control every aspect of your site's functionality and appearance.
Accessing Theme Options
Navigate to wp-admin > BeBuddy > Theme Options to access the theme settings panel. The available settings are listed below. Most fields are self-explanatory.
- General Settings - Configure general site-wide options
- Theme Styles - Customize typography and color schemes
- Layout - Configure header, page top, sidebars, and footer
- Page Settings - Configure page settings
- Blog - Configure blog display and functionality
- Modules - Configure theme-specific settings for various modules including activity, members, groups, forums, events, listings, courses, shop, and fundraisers
- Memberships - Paid Memberships Pro restriction settings
- Redirections - Configure page redirections and make your site private
- Social Links - Add your company's social media links
Important: Always click Save Changes after modifying theme options. Some changes may require clearing your browser cache to take effect.
Common Questions
Page & Post Options
Customize individual pages and posts with unique layouts, sidebars, and settings. These options override global theme settings for specific content.
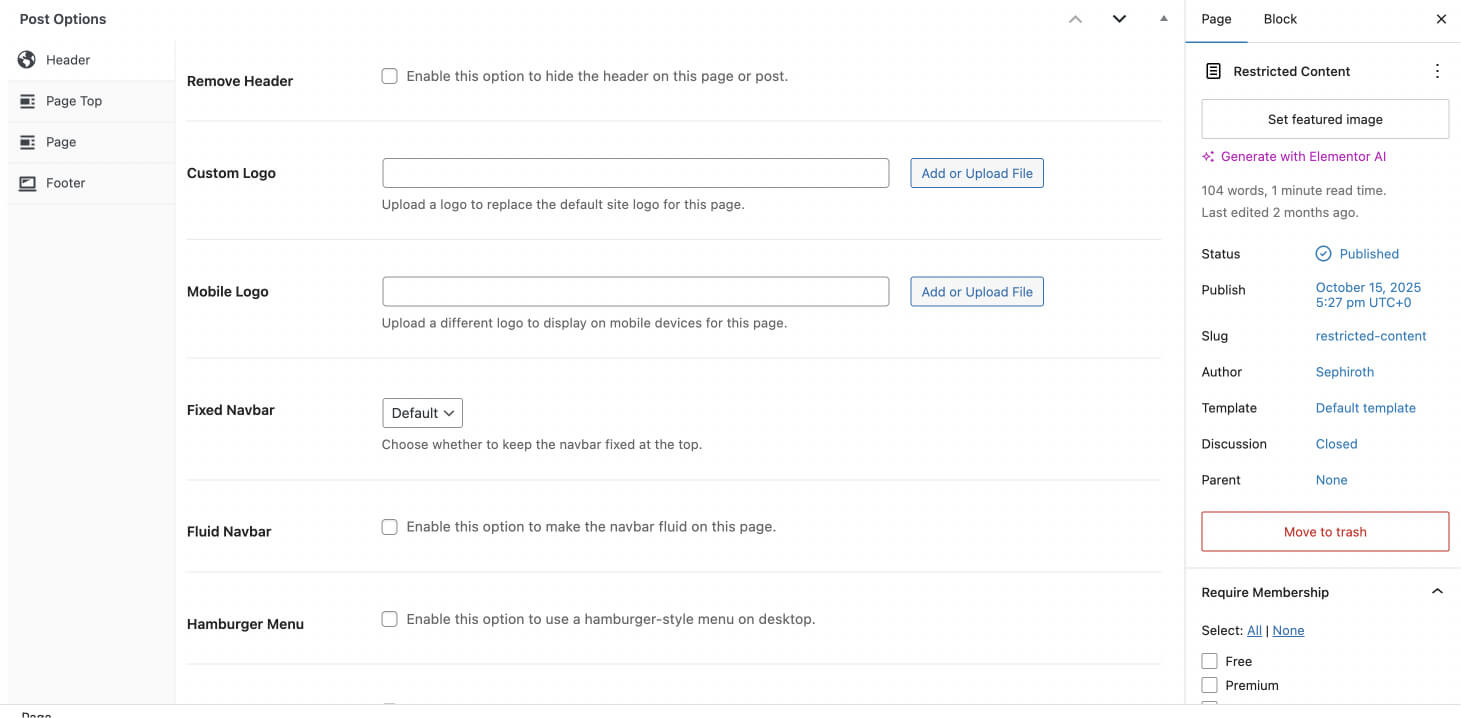
Accessing Page Options
When editing any page or post, scroll down to find the BeBuddy Page Options meta box below the content editor. The available settings are listed below. Most fields are self-explanatory.
- Header - Configure page-specific header settings
- Page Top - Configure page-specific page top settings including breadcrumb and page title
- Sidebars - Select which sidebars to display (only applicable when using a page template with sidebars)
- Page - Generate page-specific content and layouts
- Footer - Show or hide the footer on this page
Common Questions
Layout
Understanding your site's layout structure and how to customize each component.
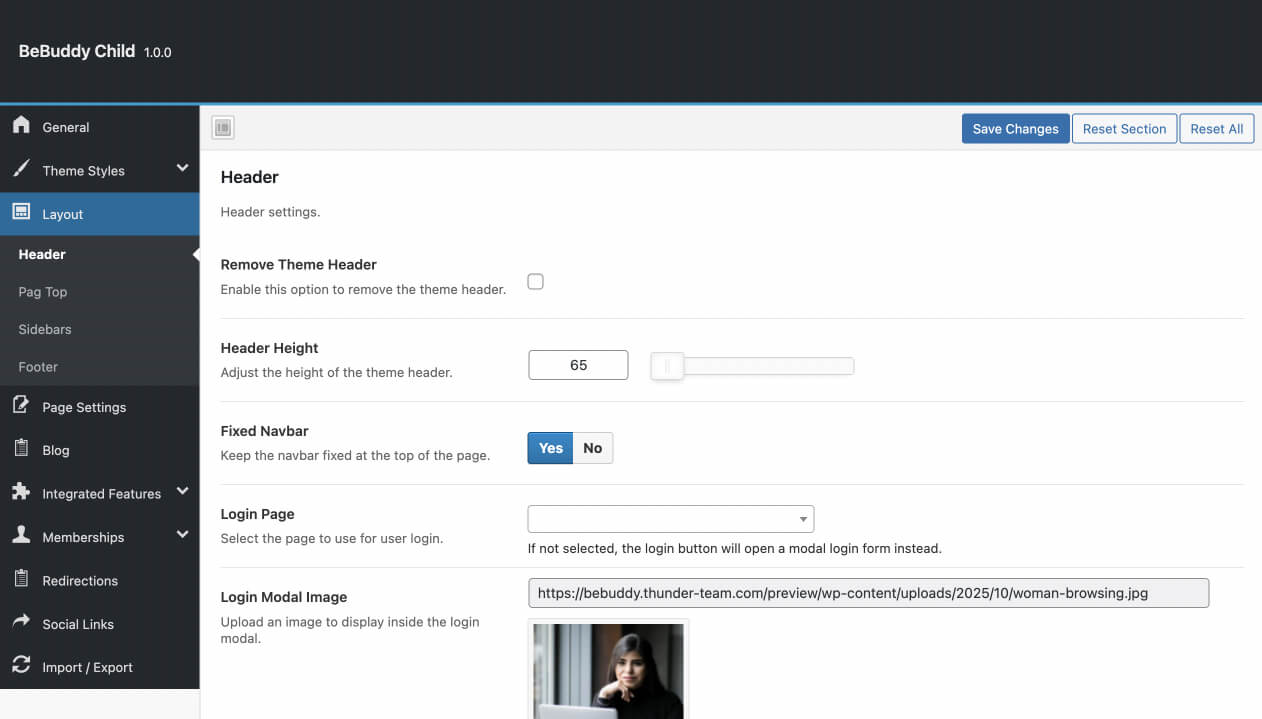
Header
The header is the top section of your site that appears on every page. It contains your logo, navigation menu, search functionality, and user interaction elements. Understanding the header components will help you customize your site's primary navigation and branding.

Header Components
The BeBuddy header consists of several key components that work together to provide navigation and functionality:
- Logo - Displays your site logo uploaded via Appearance > Customize > Site Identity. The logo serves as your primary branding element and typically links back to your homepage.
- Global Search Form - A powerful search feature that searches across all major site content including blog posts, members, groups, forums, events, listings, shop products, and fundraisers. This provides users with a unified search experience across your entire site.
- Main Header Menu - Your primary navigation menu, managed at wp-admin > Appearance > Menus.
- If you completed the Setup Wizard, a menu called Header Main Menu has been automatically created and assigned to the Header Main Menu location
- You can create custom menus and assign them to this location to replace the default menu
- Supports multi-level dropdown menus for organized navigation
- Switchers - Toggle controls for user preferences
- Color Theme Switcher: Allows logged-in users to switch between light and dark modes
- WPML Language Switcher: Allows users to switch between wpml languages
- Enable or disable switchers at Theme Options > Layout > Header
- Notification Bar - Interactive icons for user engagement and account management
- Friend Requests: Shows pending friend requests (BuddyPress)
- Notifications: Displays site notifications and activity updates
- Messages: Access to private messaging inbox
- Shopping Cart: Quick view of cart items (WooCommerce)
- My Account Menu: User profile dropdown menu
Most notification bar elements can be enabled or disabled at Theme Options > Layout > Header. The My Account menu is managed at wp-admin > Appearance > Menus and assigned to the Header Profile Menu location. If you ran the Setup Wizard, this menu has been automatically created for you.
Customizing the Header
You can customize header appearance and behavior in two places:
- Global Settings: Change default header settings for all pages at wp-admin > BeBuddy > Theme Options > Layout > Header
- Page-Specific Settings: Override global settings for individual pages by editing the page and scrolling to Page Options > Header
Common Questions
Page Top
The Page Top is a layout component that appears below the header and above the main content area. It provides context and navigation for your users.

Page Top Components
The Page Top section consists of two main elements:
- Breadcrumb Navigation - Shows the hierarchical path to the current page (e.g., Home > Blog > Article Title), helping users understand their location within your site
- Page Title - Displays the current page or post title as a prominent heading
Note: By default, the Page Top component is hidden on community page templates to provide a cleaner, more streamlined layout. Learn more about page templates in the Page Templates section.
Customizing the Page Top
You can customize the Page Top appearance and behavior in two places:
- Global Settings: Set default Page Top settings for all pages at wp-admin > BeBuddy > Theme Options > Layout > Page Top
- Page-Specific Settings: Override global settings for individual pages by editing the page and scrolling to Page Options > Page Top
Available customization options include:
- Show or hide breadcrumb navigation
- Show or hide page title
- Customize background color and text color
- Set background image
Common Questions
Breadcrumb: Enable breadcrumb navigation site-wide for community templates at Theme Options > Layout > Page Top.
Page Title: Page titles must be enabled individually for each page. Edit the page and go to Page Options > Page Top to enable the page title.
Content Area
The Content Area is the main section of your page where your primary content is displayed. It sits between the Page Top and Footer, and its width is determined by your chosen layout and sidebar configuration.

Note: To learn how to create and edit page content, see the Pages section.
Sidebar
Sidebars are secondary content areas that display widgets alongside your main content. They can be positioned on the left or right side of the page, or hidden entirely for a full-width layout.
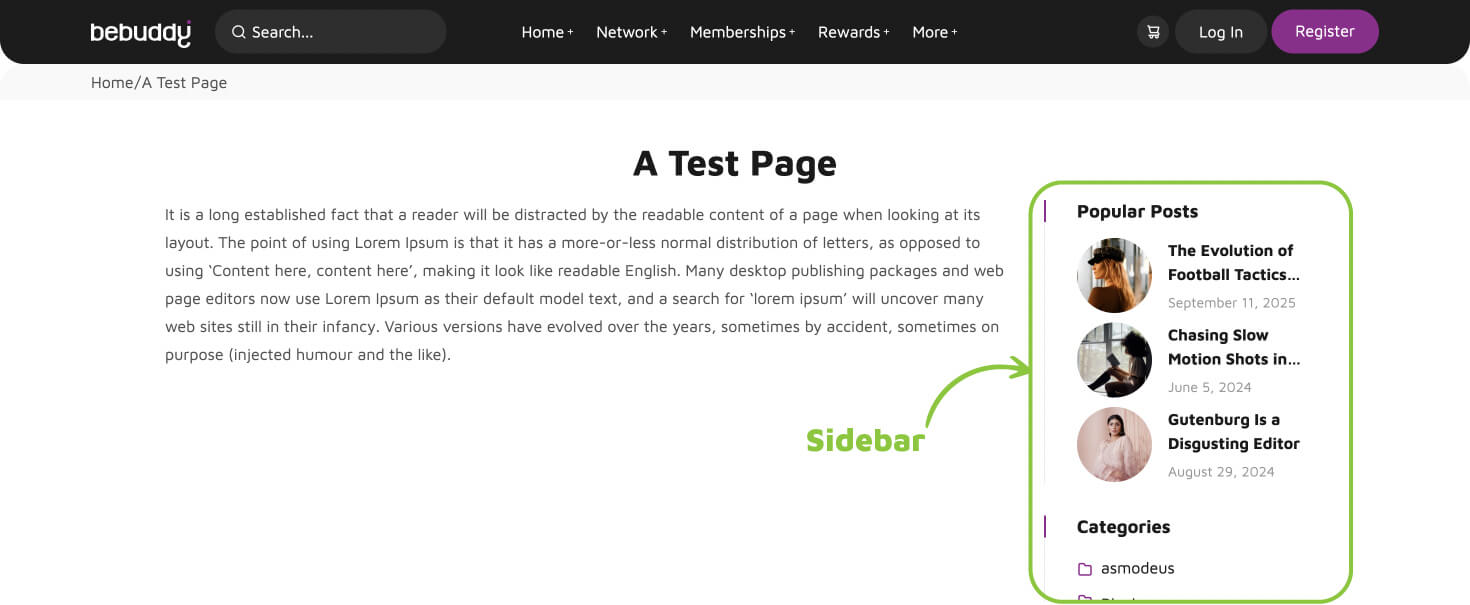
Note: Learn how to add and configure widgets in the Menus & Widgets section.
Built-in Sidebars
BeBuddy includes the following pre-configured sidebars for different sections of your site:
General Sidebars
- Default Sidebar - The primary sidebar used on most pages. Also serves as a fallback when no specific sidebar is assigned. Works with both left and right sidebar layouts.
Community Template Sidebars
- Social Sidebar Left - Appears on the left side of community page templates
- Social Sidebar Right - Appears on the right side of community page templates
Feature-Specific Sidebars
These sidebars appear on the right side of their respective pages:
- Activity - Used on activity stream pages
- Members - Used on member directory pages
- Groups - Used on group directory pages
- Forums - Used on all forum pages and the forum homepage
- Events - Used on all event pages
- Listings - Used on all listing/directory pages
- Shopping - Used on all WooCommerce shop pages
- Product Filters - Used on product archive pages to display filtering options
- Fundraisers - Used on all fundraising campaign pages
Profile Sidebars
- Member Profile Left - Left sidebar on member profile pages
- Member Profile Right - Right sidebar on member profile pages
- Group Profile Left - Left sidebar on group profile pages
- Group Profile Right - Right sidebar on group profile pages
Creating Custom Sidebars
You can create your own custom sidebars to use throughout your site:
- Go to wp-admin > BeBuddy > Theme Options > Layout > Sidebars
- Click Add New Sidebar
- Enter a name for your sidebar (e.g., "Homepage Sidebar")
- Click Save Changes
Assigning Sidebars to Pages
Once you've created a custom sidebar, you can assign it to individual pages:
- Edit the page where you want to use the custom sidebar
- Scroll down to Page Options > Sidebars
- Select your custom sidebar from the dropdown menu
- Update or publish the page
Footer
The footer is the bottom section of your site that appears on every page. It provides important information, navigation links, and contact details for your visitors.

Footer Structure
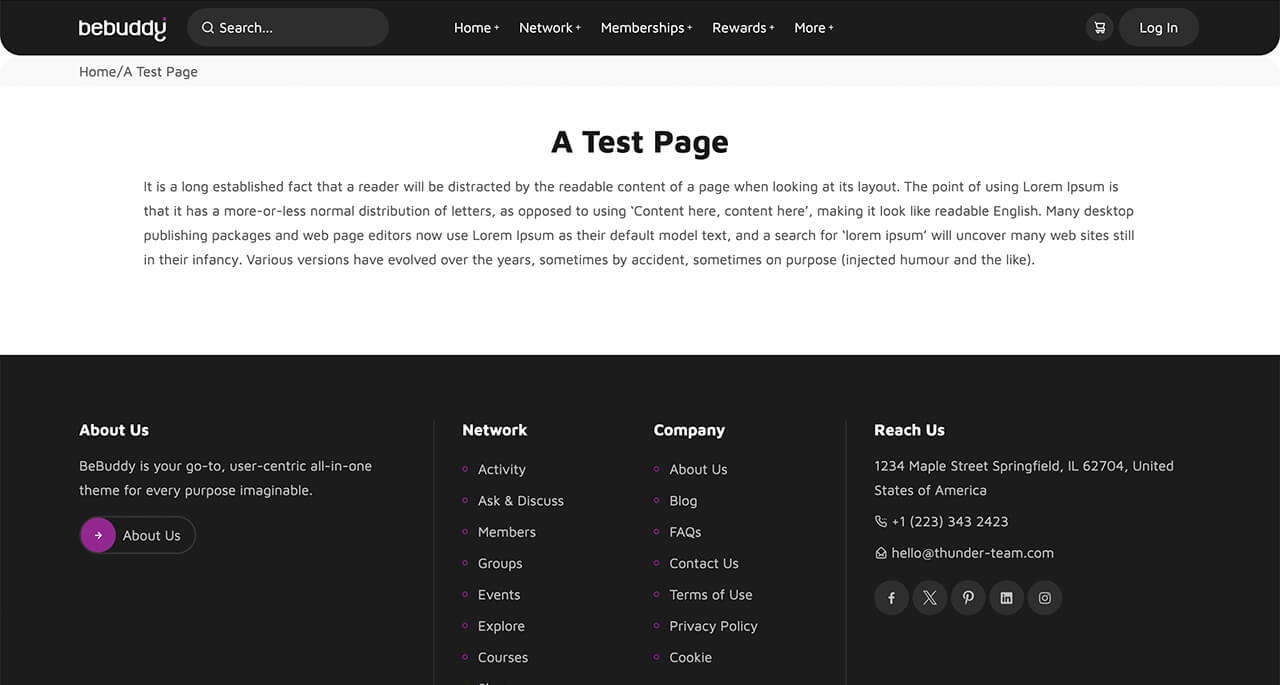
The BeBuddy footer is organized into four columns, each serving a specific purpose:
- Column 1: About Section
- Footer logo
- Short "About" text describing your site
- Call-to-action button linking to your About page
- Column 2: Footer Menu 1
- Reserved for a custom menu (e.g., "Network" menu)
- Managed at wp-admin > Appearance > Menus
- If you ran the Setup Wizard, the "Network" menu has been automatically imported
- Column 3: Footer Menu 2
- Reserved for another custom menu (e.g., "Company" menu)
- Managed at wp-admin > Appearance > Menus
- If you ran the Setup Wizard, the "Company" menu has been automatically imported
- Column 4: Contact Information
- Physical address
- Phone number
- Email address
- Social media links
Customizing the Footer
You can customize footer content and appearance in two places:
- Global Settings: Configure default footer settings for all pages at wp-admin > BeBuddy > Theme Options > Layout > Footer
- Page-Specific Settings: Override global settings for individual pages by editing the page and scrolling to Page Options > Footer
Hiding the Footer
You can hide the footer on specific pages or site-wide:
- Site-wide: Go to Theme Options > Layout > Footer and disable the footer globally
- Page-specific: Edit the page and go to Page Options > Footer to hide the footer on that page only
Common Questions
Pages
Learn how to create, edit, and manage pages on your BeBuddy site. Pages are the foundation of your website's content structure.
Adding a New Page
Creating pages in BeBuddy follows the standard WordPress process with additional theme-specific options for enhanced customization.
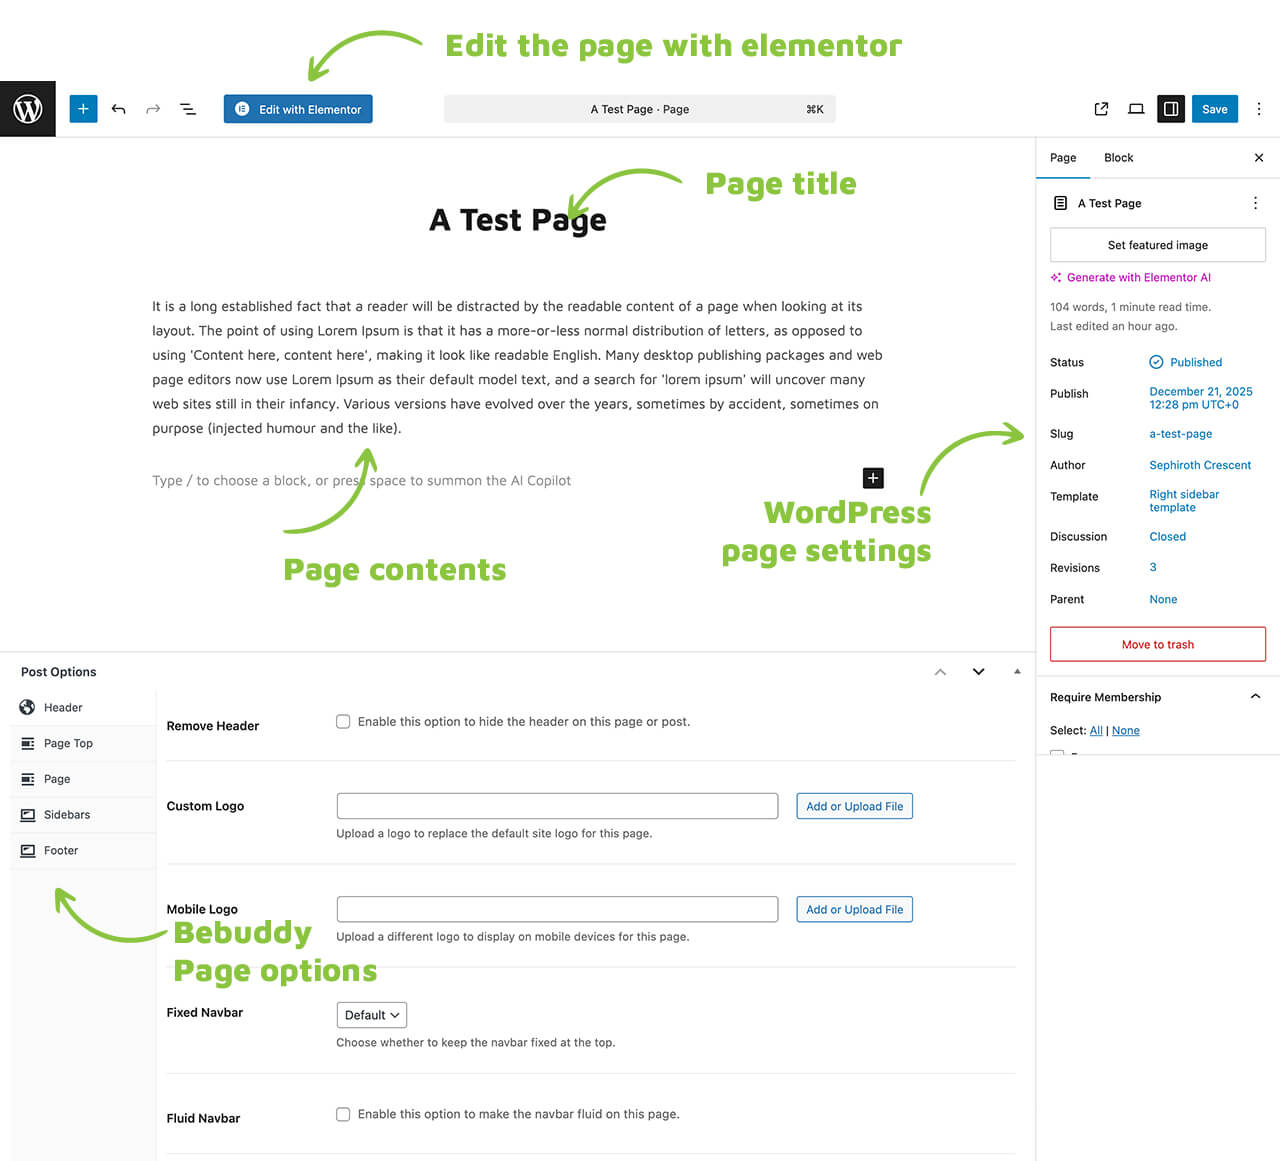
Creating a Page
- Go to wp-admin > Pages > Add New
- Enter your page title in the title field
- Add your content using the WordPress Block Editor (Gutenberg) or elementor page builder
- Configure page settings in the right sidebar
- Scroll down to configure BeBuddy Page Options (see below)
- Click Publish to make the page live, or Save Draft to continue editing later
WordPress Page Settings
The right sidebar contains standard WordPress page settings:
- Status & Visibility
- Visibility: Public, Private, or Password Protected
- Publish: Immediately or schedule for a future date
- Stick to top: Keep page at the top of page lists
- Permalink
- Customize the page URL slug
- Use lowercase letters and hyphens for SEO-friendly URLs
- Featured Image
- Set a featured image for the page
- Used in page listings and social media sharing
- Page Attributes
- Parent Page: Create page hierarchy by selecting a parent page
- Template: Choose a page template (see Page Templates section)
- Order: Set custom page order for navigation menus
- Discussion
- Enable or disable comments on the page
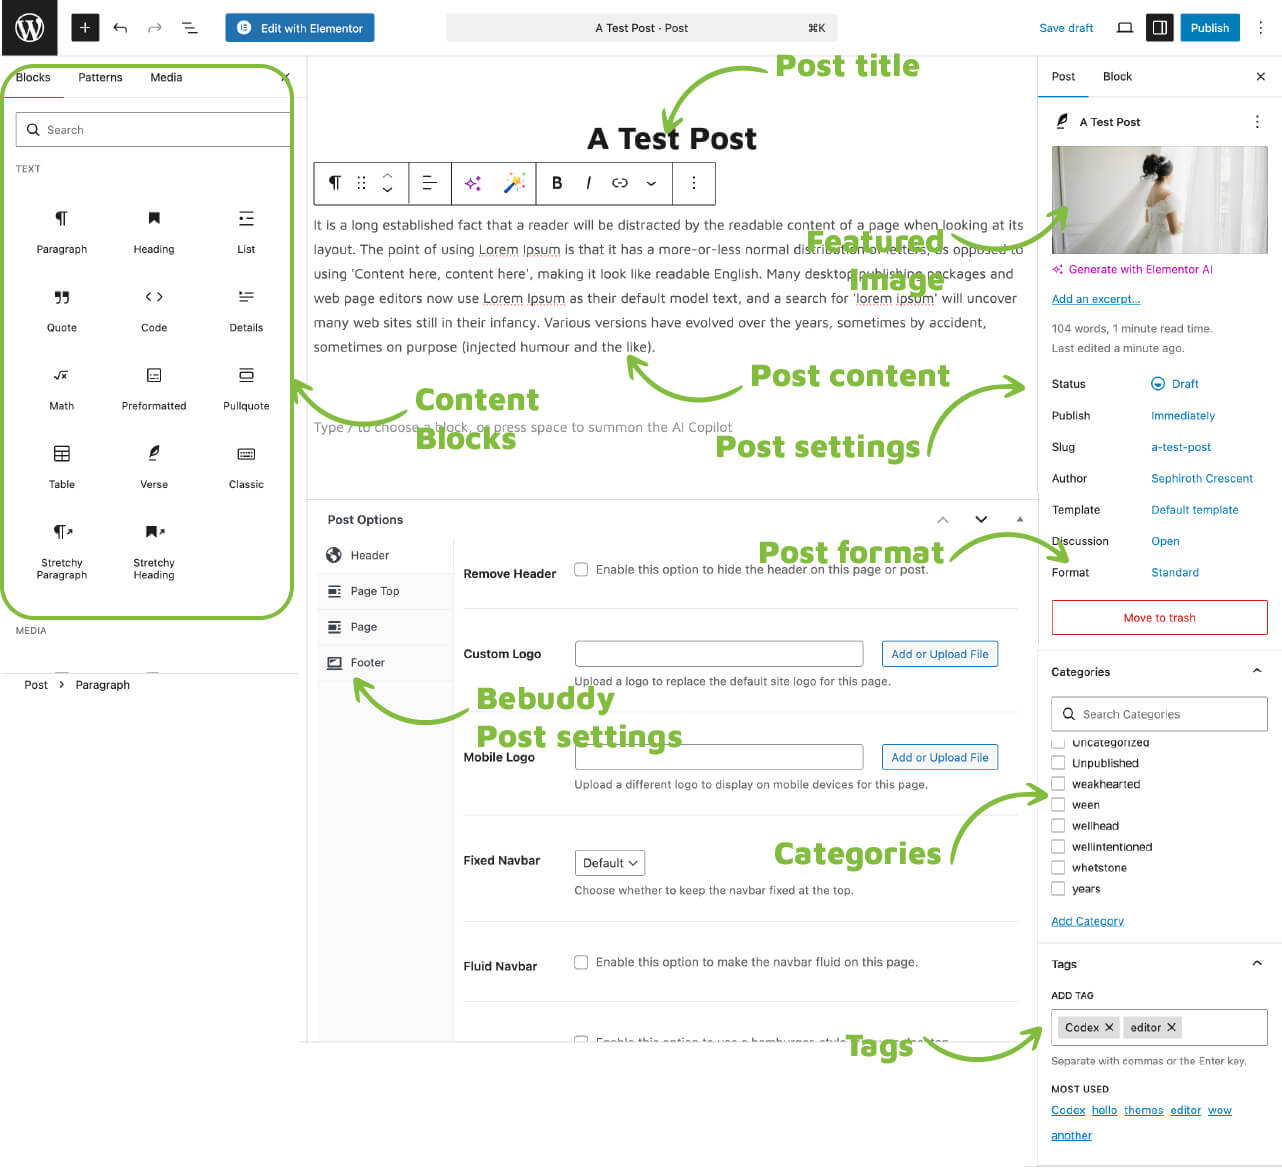
BeBuddy Page Options
Below the content editor, you'll find the BeBuddy Page Options meta box with theme-specific settings:
- Header Settings - Customize header appearance for this page (show/hide, transparency, etc.)
- Page Top Settings - Configure breadcrumb and page title display
- Sidebar Settings - Choose which sidebar to display and its position (left, right, or none)
- Page Settings - Additional page-specific layout options
- Footer Settings - Show or hide the footer on this page
Quick Tips for Creating Pages
- Use descriptive, SEO-friendly page titles
- Keep URLs short and relevant (edit the permalink)
- Use page hierarchy to organize related pages (parent/child structure)
- Preview your page before publishing to check layout and design
- Save drafts frequently to avoid losing your work
Common Questions
Pages are for static, timeless content like About, Contact, Services, etc. They don't have categories or tags and aren't displayed in chronological order.
Posts are for blog content, news, and updates. They're organized by date, categories, and tags, and appear in your blog feed. Learn more in the Posts & Blog section.
Editing an Existing Page
Editing pages in WordPress is straightforward. You can update content, modify settings, or completely redesign your pages at any time.
How to Edit a Page
- Go to wp-admin > Pages > All Pages
- Find the page you want to edit in the list
- Hover over the page title and click Edit (or click the page title directly)
- Make your changes to the content, settings, or page options
- Click Update to save your changes
Quick Edit Options
For minor changes, you can use the Quick Edit feature:
- Go to wp-admin > Pages > All Pages
- Hover over the page title
- Click Quick Edit
- Update basic settings like title, slug, date, template, or status
- Click Update to save
Note: Quick Edit is useful for changing page settings without opening the full editor. However, you cannot edit page content or BeBuddy Page Options using Quick Edit.
Editing with Elementor
If you're using Elementor to design your pages, you can edit them directly with the Elementor builder:
- Go to wp-admin > Pages > All Pages
- Hover over the page title
- Click Edit with Elementor
- Make your design changes in the Elementor interface
- Click Update or Publish to save
Learn more about using Elementor in the Using Elementor Page Builder section.
Important: User-Generated Content Pages
Warning: Avoid editing user-generated content pages with page builders like Elementor.
Pages created by plugins for Activity, Members, Groups, Events, Listings, Courses, Shops, Fundraisers, Groups, Forums, and other community features use shortcodes and plugin-specific mechanisms to display dynamic content. These pages should remain lean and functional.
Why You Shouldn't Edit These Pages:
- Plugin Dependency: These pages rely on plugin shortcodes and functions that may break if edited with page builders
- Dynamic Content: Content is generated automatically by plugins and users—manual edits can interfere with this process
- Performance: Adding heavy page builder elements can slow down these frequently accessed pages
- Updates: Plugin updates may override your custom edits, causing layout issues
What to Do Instead:
If you need to add additional information or customize these pages, use sidebars and widgets:
- Go to wp-admin > Appearance > Widgets
- Add widgets to the relevant sidebar (e.g., Events Sidebar, Listings Sidebar)
- Configure widgets to display additional information, ads, or calls-to-action
This approach keeps user-generated content pages clean, fast, and functional while still allowing you to add custom elements.
Viewing Page Revisions
WordPress automatically saves revisions of your pages, allowing you to restore previous versions:
- Edit the page you want to restore
- In the right sidebar, look for Revisions
- Click Browse to view all saved revisions
- Use the slider to compare different versions
- Click Restore This Revision to revert to a previous version
Pro Tip: Before making major changes to an important page, create a backup by duplicating the page. You can use plugins like "Duplicate Page" or "Yoast Duplicate Post" to quickly clone pages.
Common Questions
Use WordPress revisions to restore a previous version:
- Edit the broken page
- In the right sidebar, find Revisions
- Click Browse and select a working version
- Click Restore This Revision
Page Templates
Page templates control the layout and structure of your pages. BeBuddy includes several pre-built templates designed for different content types and layouts.
Available Page Templates
BeBuddy offers the following page templates:
- Full Width And Default - Content spans the entire width with no sidebars
- Left Sidebar - Content on the right with sidebar on the left
- Right Sidebar - Content on the left with sidebar on the right
- Community Template - Specialized template for user-generated content with dual sidebars
- Canvas (Elementor) - Blank template for full Elementor design control
How to Apply a Page Template
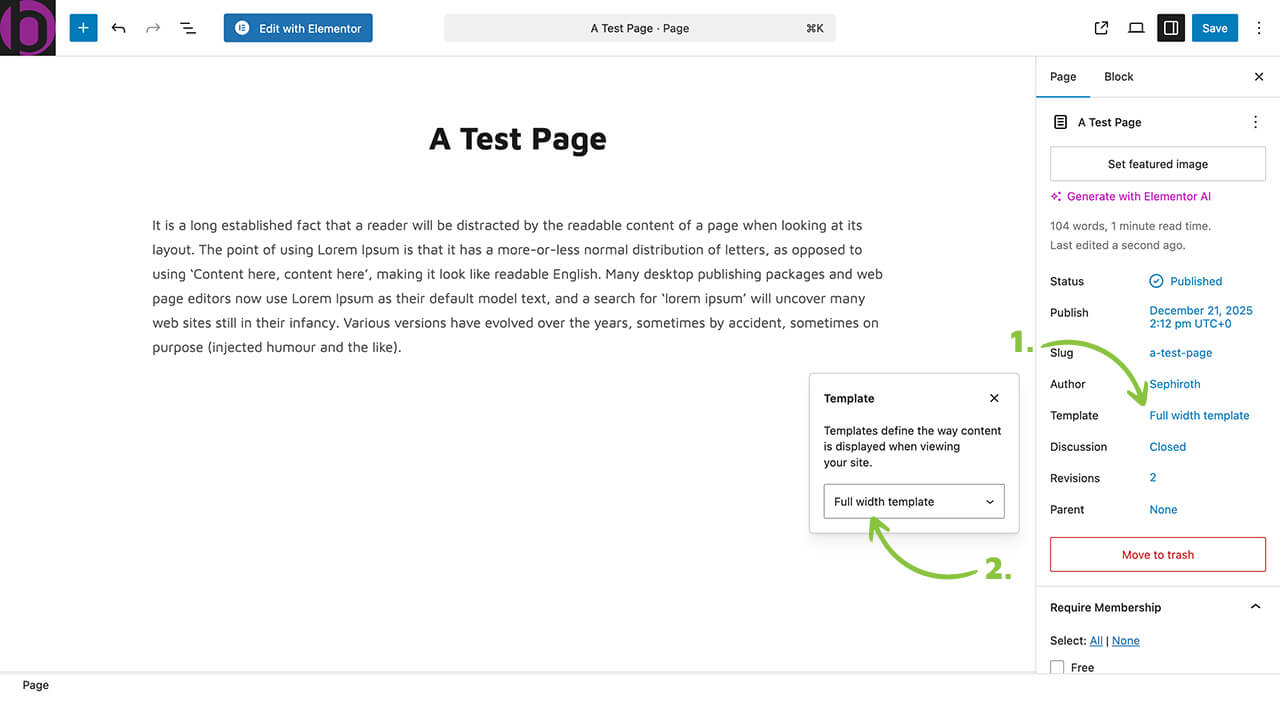
- Edit the page you want to apply a template to
- In the right sidebar, find Page Attributes
- Click the Template dropdown
- Select your desired template
- Click Update or Publish to save
Template Details
Full Width and Default Template
Removes sidebars entirely, allowing content to span the full width of the container. Perfect for:
- Landing pages
- Sales pages
- Portfolio showcases
- Pages with wide images or videos
- Elementor-designed pages
Left Sidebar Template
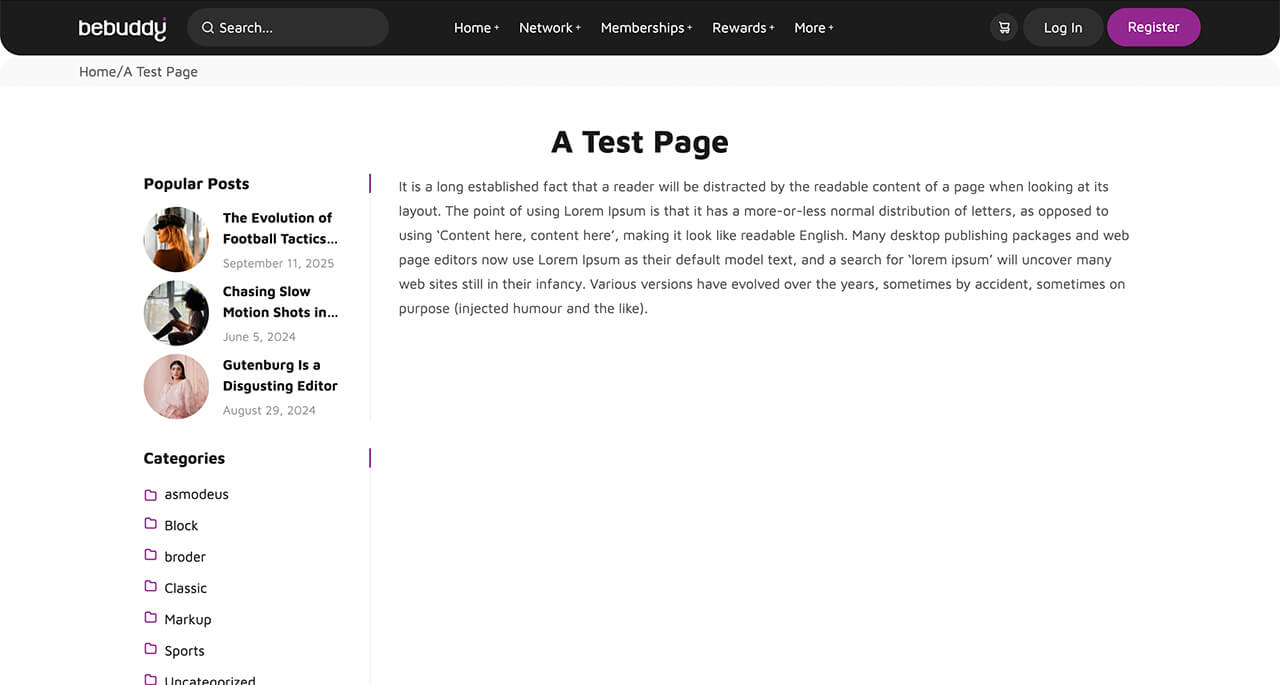
Forces the sidebar to appear on the left side of the page, with content on the right. Ideal for:
- Navigation-heavy pages
- Documentation or knowledge base pages
- Pages where you want to emphasize sidebar content
Right Sidebar Template
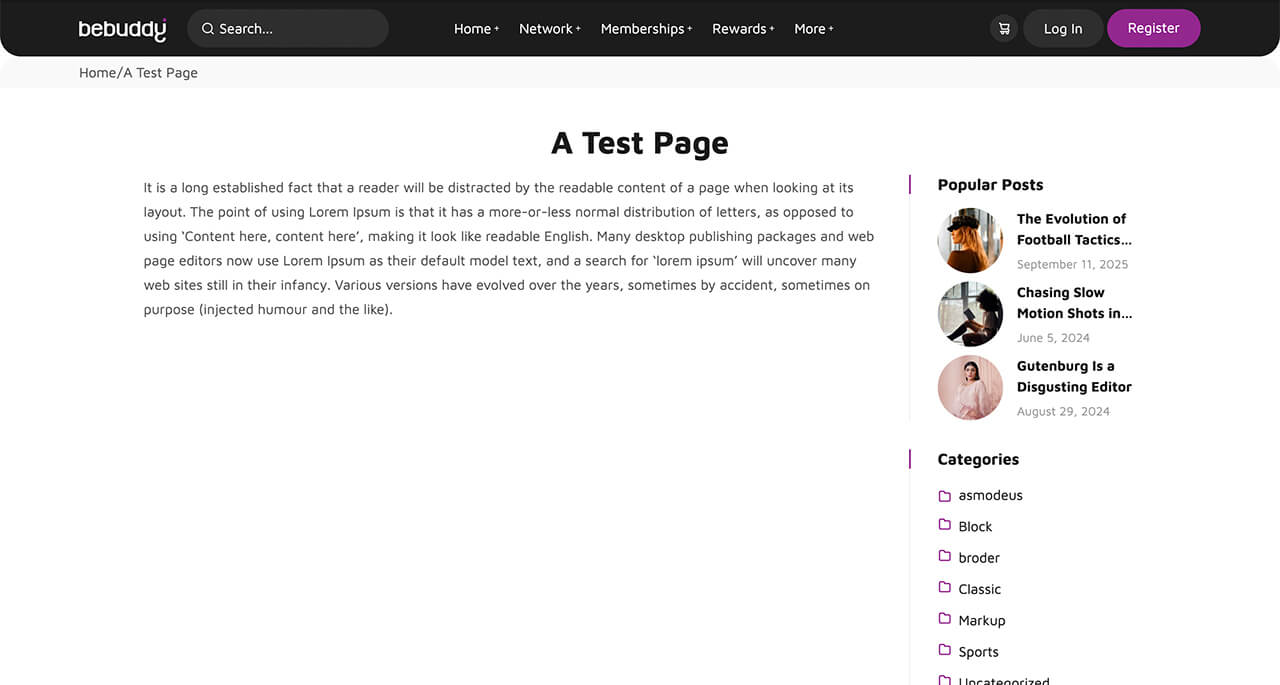
Forces the sidebar to appear on the right side of the page, with content on the left. This is the most common blog-style layout. Best for:
- Standard content pages
- Pages with supplementary sidebar widgets
Community Template
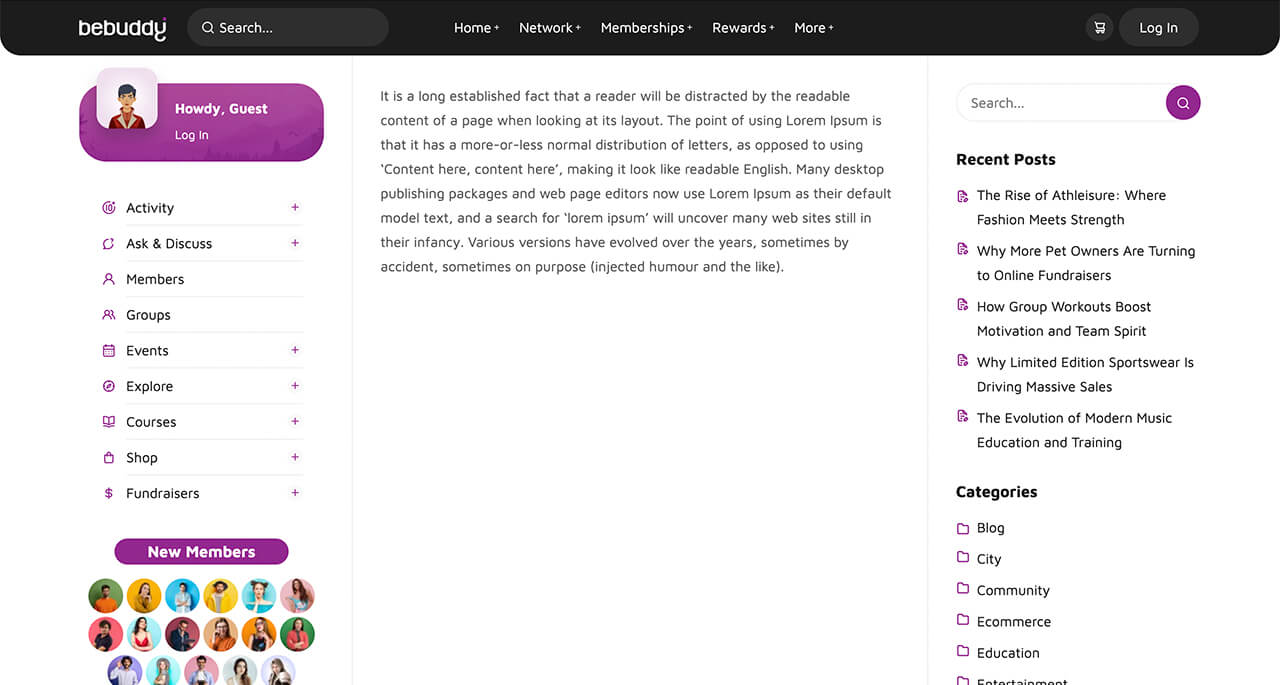
A specialized template designed for user-generated content pages. This template features a unique dual-sidebar layout optimized for community features.
Community Template Structure:
- Left Sidebar (Social Sidebar Left):
- Displays the community navigation menu
- Remains fixed across all community pages for consistent navigation
- Provides quick access to Activity, Members, Groups, Forums, Events, and other community features
- Managed at wp-admin > Appearance > Widgets > Social Sidebar Left
- Content Area:
- Displays dynamic, user-generated content
- Automatically populated by plugins (BuddyPress, Events Manager, wpForo, etc.)
- Should not be edited with page builders
- Right Sidebar (Context-Specific):
- Changes based on the page content
- Activity Page: Uses "Activity" sidebar
- Members Page: Uses "Members" sidebar
- Groups Page: Uses "Groups" sidebar
- Forums Page: Uses "Forums" sidebar
- Events Page: Uses "Events" sidebar
- Courses Page: Uses "Courses" sidebar
- Shop Page: Uses "Shopping" sidebar
- And so on for other features
Best Practice: Keep the left sidebar (community menu) consistent across all community pages. This provides a familiar navigation experience for your users as they browse different community sections.
Canvas Template (Elementor)
A completely blank template with no header, footer, or sidebars. Gives you full control to design the entire page with Elementor. Use for:
- Custom landing pages
- Coming soon pages
- Maintenance mode pages
- Completely custom designs
Note: The Canvas template removes all theme elements. You'll need to build everything from scratch using Elementor, including navigation if needed.
Common Questions
It depends on your homepage design:
- Full Width or Canvas: If you're using Elementor to create a custom homepage design
- Community Template: If your homepage displays activity feeds or community content
- Default Template: For a traditional homepage with sidebar widgets
Menus
Navigation menus are essential for helping users navigate your site. BeBuddy provides multiple menu locations and comes with pre-configured menus to get you started quickly.
Menu Locations
BeBuddy registers four menu locations where you can display navigation menus:
- Header Main Menu - Primary navigation menu displayed in the site header
- Header Profile Menu - User account dropdown menu in the header (visible to logged-in users)
- Footer Menu 1 - First footer menu column (typically for network/community links)
- Footer Menu 2 - Second footer menu column (typically for company/legal links)
Pre-Configured Menus
If you ran the Setup Wizard and imported demo content, the following seven menus have been automatically created and assigned:
| Menu Name | Assigned Location | Purpose |
|---|---|---|
| Header Main Menu | Header Main Menu | Primary site navigation in the header |
| Header Profile Menu | Header Profile Menu | User account dropdown menu for logged-in users |
| Network | Footer Menu 1 | Community and network-related links in the footer |
| Company | Footer Menu 2 | Company information and legal links in the footer |
| Community | Not assigned | Displayed in the Community Template left sidebar using the Navigation Menu widget |
| Gamification | Not assigned | Displayed on reward pages (Points, Achievements, Ranks) |
| Blog Categories | Not assigned | Displayed on the Magazine homepage template |
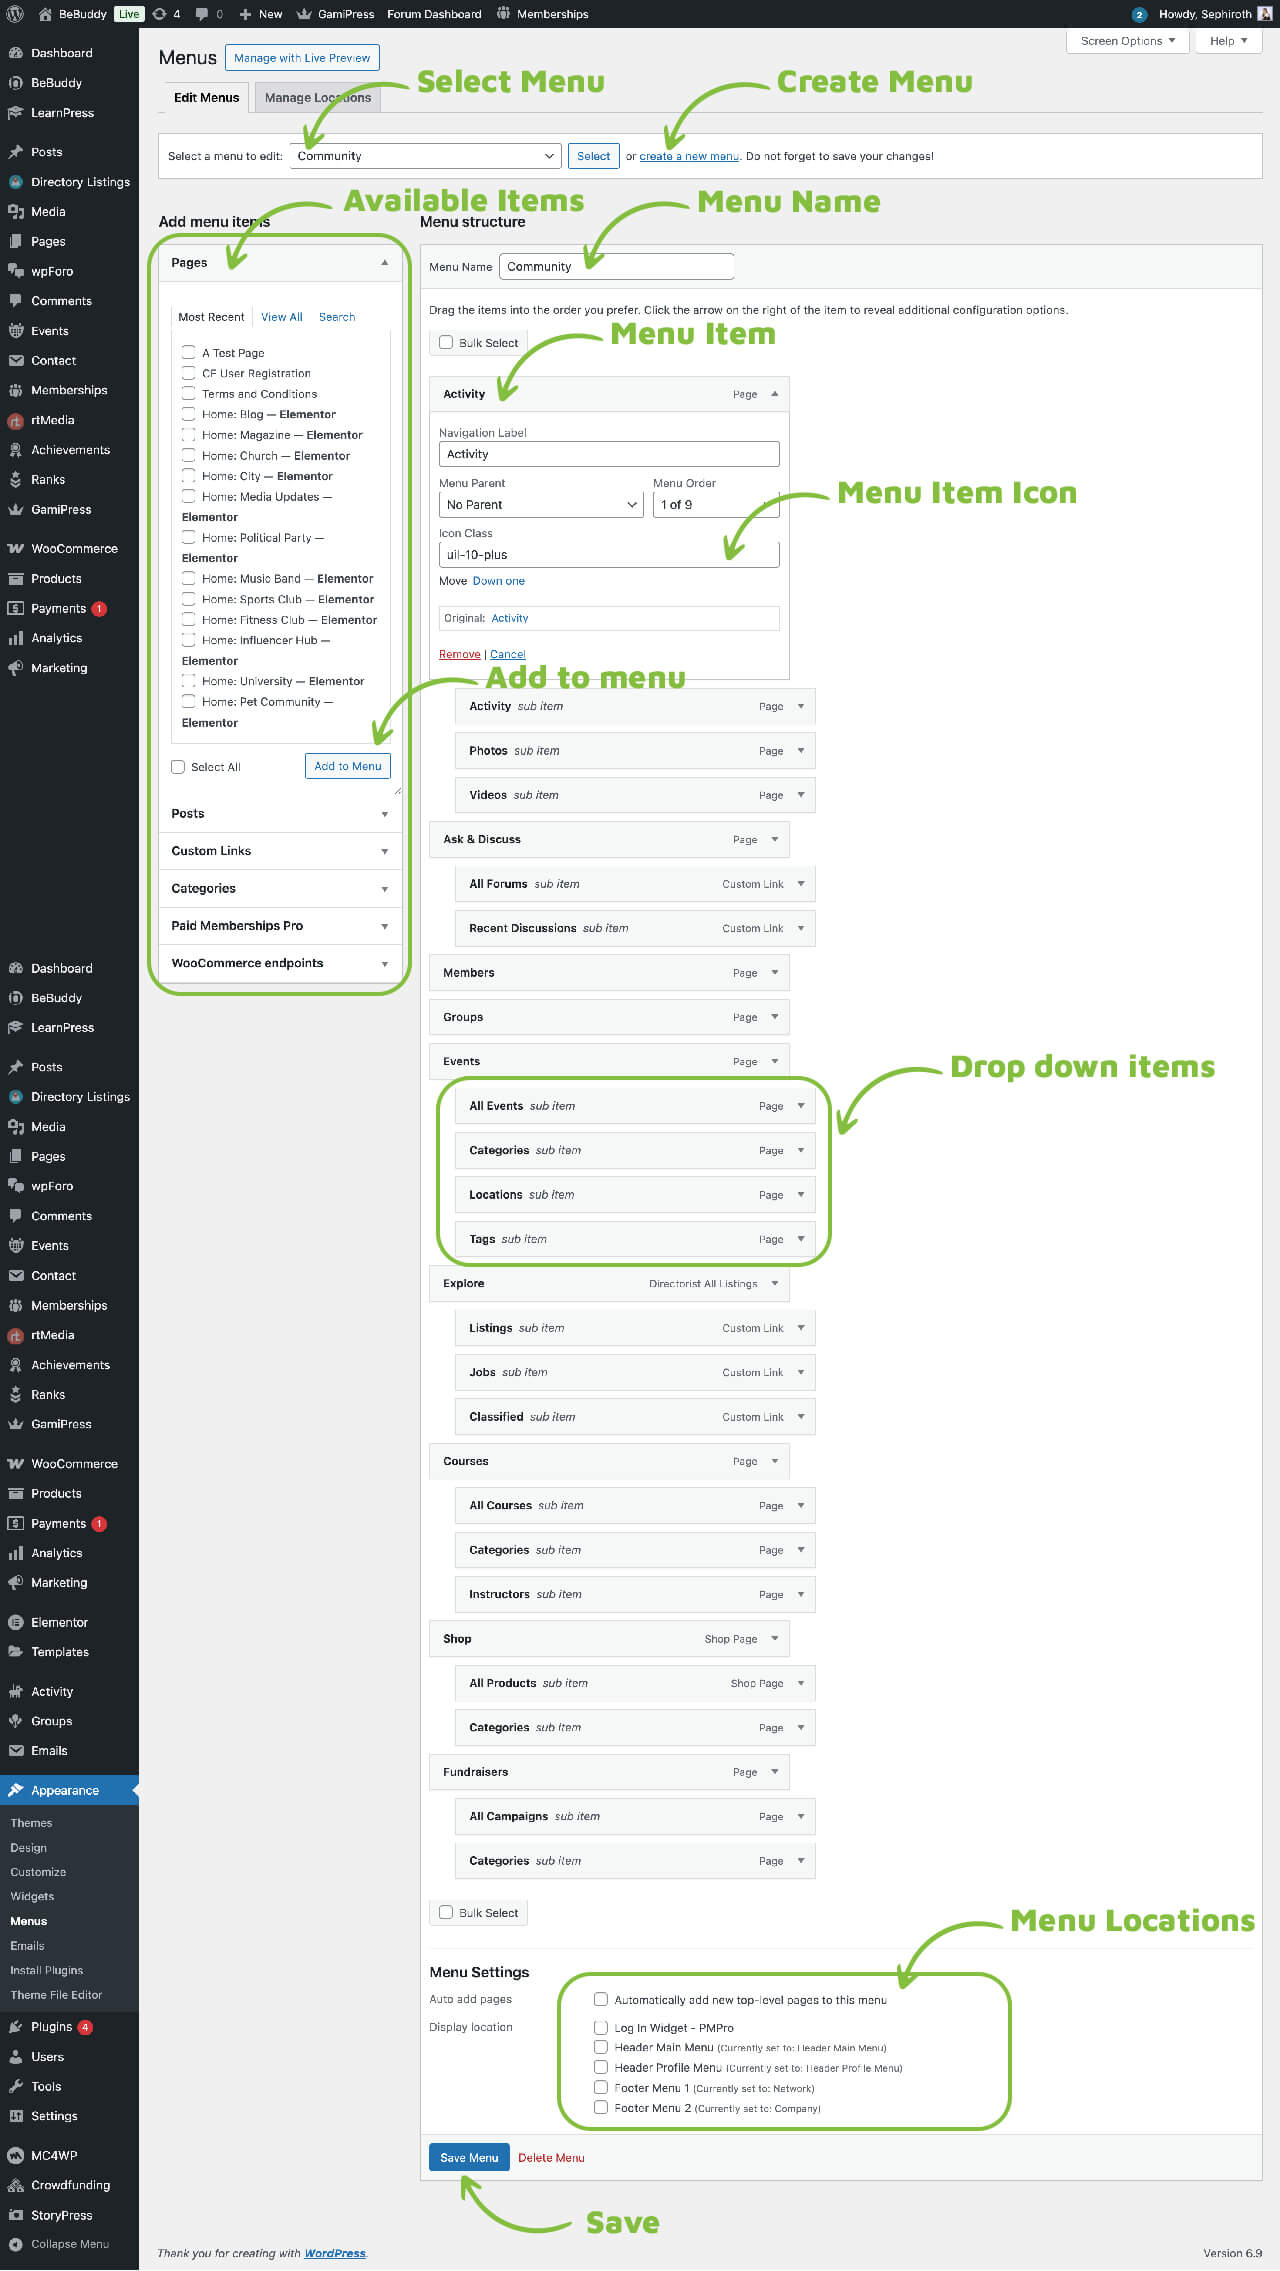
Creating a New Menu
- Go to wp-admin > Appearance > Menus
- Click Create a new menu at the top
- Enter a menu name (e.g., "Main Navigation")
- Click Create Menu
- Add menu items from the left sidebar (Pages, Posts, Custom Links, Categories, etc.)
- Drag and drop items to organize and create hierarchy
- Under Menu Settings, check the location(s) where you want to display this menu
- Click Save Menu
Adding Menu Items
You can add various types of items to your menus:
- Pages - Link to any page on your site
- Posts - Link to individual blog posts
- Custom Links - Add external URLs or custom internal links
- Categories - Link to post category archives
- Tags - Link to post tag archives
To add items:
- Expand the section for the type of item you want to add (Pages, Posts, etc.)
- Select the items you want to add by checking the boxes
- Click Add to Menu
- The items will appear in your menu structure on the right
Creating Dropdown Menus
Create multi-level dropdown menus by dragging menu items slightly to the right:
- In the menu structure, drag a menu item slightly to the right under another item
- The indented item becomes a sub-item (dropdown)
- You can create multiple levels of dropdowns
- Drag items back to the left to remove them from the dropdown
Editing Menu Items
Click the down arrow on any menu item to expand its settings:
- Navigation Label - The text displayed in the menu (can be different from the page title)
- Title Attribute - Tooltip text that appears on hover
- Icon Class - Add icon classes to display icons next to menu items. Icon classes can be found in the download-package > icons.zip file
- Link Target - Open link in a new tab/window
- Description - Additional text (theme support required)
Assigning Menus to Locations
You can assign menus to locations in two ways:
Method 1: From the Menu Editor
- Edit the menu at Appearance > Menus
- Scroll down to Menu Settings
- Check the box for the location(s) where you want to display this menu
- Click Save Menu
Method 2: From Manage Locations
- Go to Appearance > Menus
- Click the Manage Locations tab
- Use the dropdown menus to assign menus to each location
- Click Save Changes
Special Menu Considerations
Community Menu
The Community menu is designed for the Community Template's left sidebar:
- Not assigned to a theme location
- Displayed using the Navigation Menu widget
- Add it to the Social Sidebar Left widget area
- Provides consistent navigation across all community pages
Gamification Menu
The Gamification menu appears on reward-related pages:
- Displayed on Reward: Points, Reward: Achievements, and Reward: Ranks pages
- Helps users navigate between different gamification features
- Inserted via Elementor builder on reward pages (Points, Achievements, Ranks)
Blog Categories Menu
The Blog Categories menu is used on the Magazine homepage:
- Displays blog categories for easy navigation
- Inserted via Elementor on the Magazine homepage template
- Can be customized to feature your most important categories
Common Questions
Widgets
Widgets are modular blocks of content that you can add to widget areas (sidebars, footers, etc.) to enhance your site's functionality. They allow you to add features and content without writing any code.
What Are Widgets?
Widgets are small blocks that perform specific functions, such as displaying recent posts, search bars, calendars, custom menus, or social media feeds. You can drag and drop widgets into widget areas to customize different sections of your site.
Accessing Widgets
You can manage widgets in two ways:
- Appearance > Widgets: Go to wp-admin > Appearance > Widgets for the classic widget interface
- Customizer: Go to Appearance > Customize > Widgets for live preview while editing
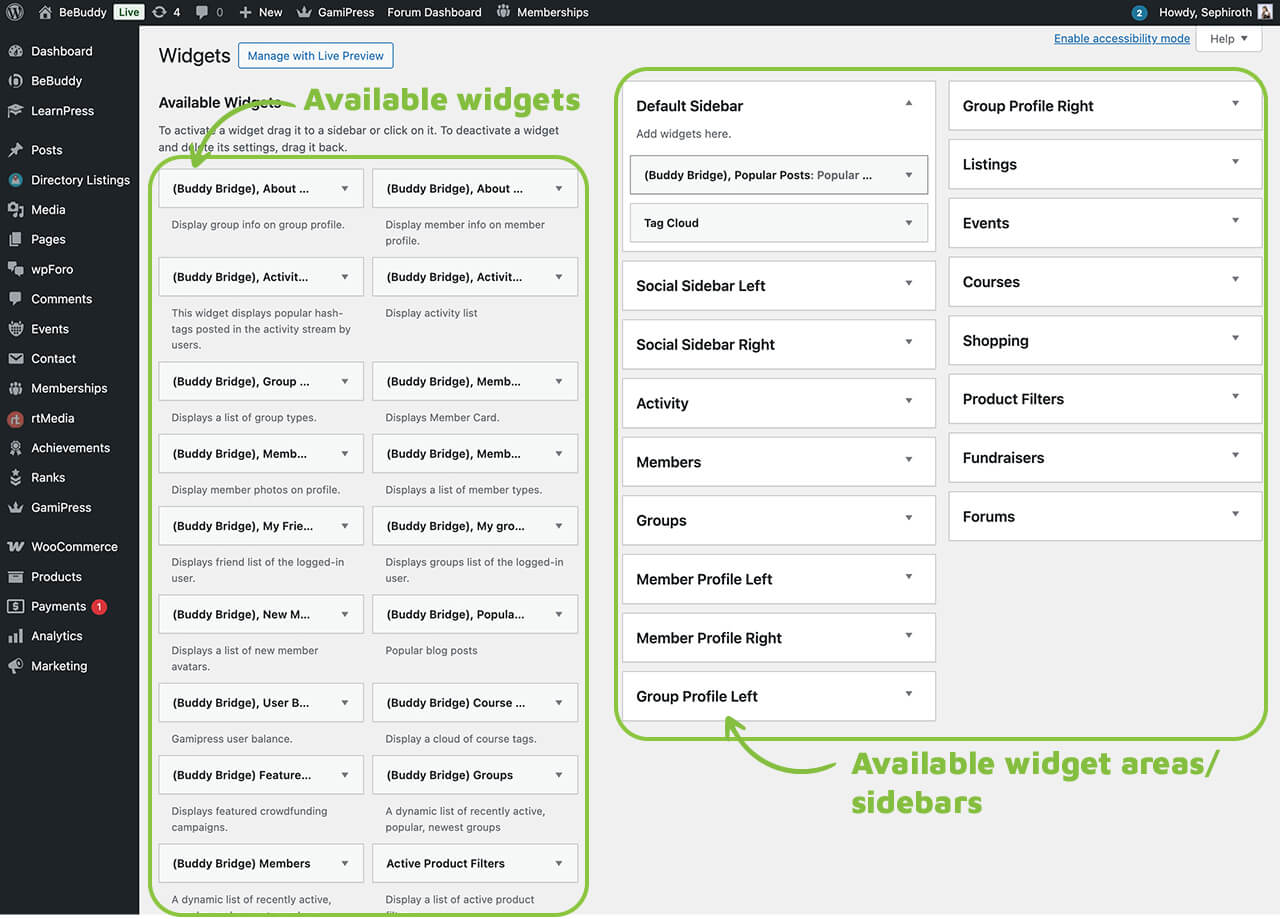
Available Widget Areas
BeBuddy includes multiple widget areas where you can add widgets. See the Sidebar section for a complete list of all available widget areas.
Adding Widgets
- Go to wp-admin > Appearance > Widgets
- Find the widget area where you want to add a widget (e.g., "Default Sidebar")
- Click the + button or Add a Widget
- Search for or browse available widgets
- Click on the widget you want to add
- Configure the widget settings (title, content, options, etc.)
- Click Save or the widget will auto-save
Managing Widgets
Reordering Widgets
Drag and drop widgets within a widget area to change their display order. The order in the admin panel matches the order on your site.
Editing Widgets
Click on a widget to expand it and access its settings. Each widget has different options depending on its functionality.
Removing Widgets
To remove a widget, expand it and click Delete or Remove. The widget will be removed from that widget area but remains available to add elsewhere.
Inactive Widgets
If you want to temporarily remove a widget without losing its settings, drag it to the Inactive Widgets area. You can restore it later with all settings intact.
Widget Best Practices
- Don't overcrowd sidebars—use 2-3 widgets maximum for better user experience
- Use descriptive widget titles to help users understand their purpose
- Test widgets on mobile devices to ensure they display properly
- Use the Navigation Menu widget to display the Community menu in the Social Sidebar Left
- Keep widget content relevant to the page or section where it appears
- Regularly review and remove unused widgets to improve site performance
Common Questions
Common reasons and solutions:
- Make sure the widget area is enabled for the page you're viewing (check Page Options)
- Verify you're adding widgets to the correct widget area for that page
- Check if the page template supports sidebars (Full Width template has no sidebars)
- Clear your browser cache and any caching plugins
- Ensure required plugins are active (e.g., BuddyPress for Buddy Bridge widgets)
Posts & Blog
Learn how to create and manage blog posts on your BeBuddy site. Posts are perfect for news, articles, updates, and any time-sensitive content.
Adding a New Post
Creating blog posts in BeBuddy follows the standard WordPress process. Posts are ideal for time-sensitive content like news, articles, and updates.
Creating a Post
- Go to wp-admin > Posts > Add New
- Enter your post title in the title field
- Add your content using the WordPress Block Editor (Gutenberg)
- Configure post settings in the right sidebar
- Assign categories and tags for organization
- Set a featured image (recommended for better visual presentation)
- Click Publish to make the post live, or Save Draft to continue editing later
WordPress Post Settings
The right sidebar contains standard WordPress post settings:
- Status & Visibility
- Visibility: Public, Private, or Password Protected
- Publish: Immediately or schedule for a future date
- Stick to top: Keep post at the top of the blog
- Permalink
- Customize the post URL slug
- Use lowercase letters and hyphens for SEO-friendly URLs
- Categories
- Assign the post to one or more categories
- Create new categories if needed
- Tags
- Add relevant tags to help users find related content
- Separate multiple tags with commas
- Featured Image
- Set a featured image for the post
- Displayed in blog archives and at the top of the post
- Recommended size: 1280x600 pixels or larger
- Excerpt
- Write a short summary of the post
- Used in blog archives and search results
- If left empty, WordPress will auto-generate one
- Discussion
- Enable or disable comments on the post
Quick Tips for Creating Posts
- Use descriptive, engaging post titles to attract readers
- Always add a featured image for better visual appeal
- Assign posts to relevant categories for better organization
- Add 3-5 relevant tags to improve discoverability
- Write a custom excerpt for better control over how your post appears in archives
- Use the Block Editor to add rich media (images, videos, galleries, etc.)
- Preview your post before publishing to check formatting
- Schedule posts in advance to maintain a consistent publishing schedule
Common Questions
Posts are for time-sensitive, chronological content like blog articles, news, and updates. They have categories, tags, and appear in your blog feed organized by date.
Pages are for static, timeless content like About, Contact, and Services. They don't have categories or tags and aren't organized by date. Learn more in the Pages section.
Post Formats
Post formats allow you to style different types of posts in unique ways. BeBuddy displays the format name as a badge on archive page thumbnails, making it easy for users to identify the type of content at a glance.
What Are Post Formats?
Post formats are a WordPress feature that lets you categorize posts by their content type. Each format can have a different visual presentation, helping your blog feel more dynamic and organized.
Available Post Formats
BeBuddy supports the following post formats:
- Standard - Default format for regular blog posts with text and images
- Video - Posts featuring video content (YouTube, Vimeo, self-hosted)
- Audio - Posts with audio files or music embeds
- Gallery - Posts showcasing multiple images in a gallery
- Image - Posts focused on a single image
- Quote - Posts highlighting a quotation
- Link - Posts sharing an external link
- Aside - Short, note-like posts (similar to social media updates)
Setting a Post Format
To assign a format to your post:
- Edit or create a post at wp-admin > Posts
- In the right sidebar, find the Post panel
- Look for the Format section
- Select the appropriate format from the list
- Publish or update your post
Make sure the Display Post Format Icon option is enabled in WP-Admin > BeBuddy > Theme Options > Blog.
How Post Formats Appear
In BeBuddy, post formats are visually distinguished in the following ways:
- Archive Pages: A format badge appears on post thumbnails (e.g., "Video", "Gallery", "Quote")
Best Practices for Post Formats
- Video Posts: Embed videos using the Video block or paste a YouTube/Vimeo URL
- Audio Posts: Use the Audio block or embed from SoundCloud, Spotify, etc.
- Gallery Posts: Use the Gallery block to showcase multiple images
- Quote Posts: Use the Quote block and attribute the source
- Link Posts: Include the external link prominently in your content
- Standard Posts: Use for traditional blog articles with mixed content
Note: If you don't select a format, posts will default to the "Standard" format.
Common Questions
Categories & Tags
Categories and tags help organize your blog posts and make it easier for visitors to find related content. They're essential for creating a well-structured, user-friendly blog.
What Are Categories?
Categories are broad groupings for your posts. They create a hierarchical structure for your content, similar to a table of contents. Every post should be assigned to at least one category.
What Are Tags?
Tags are specific keywords that describe the details of your post. Unlike categories, tags are not hierarchical and are more flexible. They help users find posts about specific topics.
Managing Categories
Creating Categories
- Go to wp-admin > Posts > Categories
- Enter a category name (e.g., "Technology", "Lifestyle", "News")
- Add a slug (URL-friendly version, auto-generated if left empty)
- Select a parent category if creating a subcategory (optional)
- Write a description (optional, but helpful for SEO)
- Click Add New Category
Assigning Categories to Posts
When editing a post, find the Categories panel in the right sidebar:
- Check the box next to existing categories to assign them
- Click Add New Category to create and assign a new one
- You can assign multiple categories to a single post
Creating Subcategories
You can create hierarchical categories for better organization:
- Example: "Technology" (parent) > "Web Development" (child) > "WordPress" (grandchild)
- When creating a category, select a parent from the dropdown
- Subcategories help create a more organized content structure
Managing Tags
Creating Tags
- Go to wp-admin > Posts > Tags
- Enter a tag name (e.g., "WordPress Tips", "SEO", "Tutorial")
- Add a slug (optional)
- Write a description (optional)
- Click Add New Tag
Assigning Tags to Posts
When editing a post, find the Tags panel in the right sidebar:
- Type tag names separated by commas
- Click Add or press Enter
- Select from previously used tags by clicking Choose from the most used tags
- You can add as many tags as relevant (but don't overdo it)
Categories vs. Tags: When to Use Each
| Aspect | Categories | Tags |
|---|---|---|
| Purpose | Broad groupings | Specific details |
| Structure | Hierarchical (can have subcategories) | Flat (no hierarchy) |
| Required? | Every post needs at least one | Optional |
| How Many? | 1-3 per post (recommended) | 3-10 per post (recommended) |
| Example | Technology, Lifestyle, Travel | WordPress, SEO, Tutorial, Beginner |
Best Practices
- Categories: Keep them broad and limited (5-10 main categories is ideal)
- Tags: Be specific and descriptive (use 3-10 tags per post)
- Consistency: Use the same terminology across posts (e.g., don't mix "WP" and "WordPress")
- Don't Duplicate: Don't create a tag with the same name as a category
- Plan Ahead: Create your main categories before you start blogging
- Review Regularly: Clean up unused or redundant categories and tags
- SEO-Friendly: Use descriptive names that include keywords
Viewing Category and Tag Archives
WordPress automatically creates archive pages for each category and tag:
- Category Archives:
yoursite.com/category/category-name/ - Tag Archives:
yoursite.com/tag/tag-name/ - These pages display all posts assigned to that category or tag
- Users can click categories and tags on posts to view related content
Common Questions
If you delete a category, posts assigned to it will be moved to the default "Uncategorized" category. If you delete a tag, it's simply removed from all posts—posts won't be assigned to any replacement tag.
Tip: Instead of deleting, consider renaming or merging categories/tags to preserve your content organization.
Featured Images
Featured images are the main visual representation of your blog posts. They appear in blog archives, at the top of single posts, and when sharing on social media. Adding featured images makes your blog more visually appealing and professional.
What Is a Featured Image?
A featured image (also called a post thumbnail) is the primary image associated with a blog post. It's displayed prominently in various places throughout your site to give readers a visual preview of your content.
Setting a Featured Image
- Edit or create a post at wp-admin > Posts
- In the right sidebar, find the Featured Image panel
- Click Set featured image
- Upload a new image or select from your Media Library
- Click Set featured image to confirm
- The image will appear in the Featured Image panel
- Publish or update your post
Recommended Image Size
For optimal display across all areas of your BeBuddy site, use the following specifications:
- Recommended Size: 1280 x 600 pixels
- Aspect Ratio: 16:9 or 2:1 (landscape orientation)
- File Format: JPG or PNG
- File Size: Keep under 200KB for faster loading (use image compression)
- Minimum Size: 800 x 400 pixels (for acceptable quality)
Note: WordPress will automatically create multiple sizes from your uploaded image, but starting with the recommended dimensions ensures the best quality across all layouts.
Where Featured Images Appear
In BeBuddy, featured images are displayed in the following locations:
- Blog Archives: Thumbnail on blog homepage, category pages, tag pages, and search results
- Single Post Pages: Large image at the top of the post content
- Related Posts: Thumbnail in the related posts section
- Social Media: When posts are shared on Facebook, Twitter, etc.
- Widgets: Recent Posts widget and similar widgets that display post thumbnails
Best Practices for Featured Images
- Always Use Featured Images: Every post should have one for consistency and visual appeal
- High Quality: Use sharp, clear images that look professional
- Relevant Content: Choose images that relate to your post topic
- Consistent Style: Maintain a similar visual style across all featured images for brand consistency
- Optimize File Size: Compress images to improve page load speed without sacrificing quality
- Add Alt Text: Include descriptive alt text for SEO and accessibility
- Avoid Text-Heavy Images: Text in images doesn't scale well on mobile devices
- Use Original Images: When possible, use unique images rather than generic stock photos
Changing or Removing a Featured Image
To change a featured image:
- Edit the post
- Click on the current featured image in the sidebar
- Click Replace image or Remove featured image
- Select a new image or leave it empty
- Update the post
Image Optimization Tips
- Use tools like TinyPNG, ShortPixel, or Imagify to compress images before uploading
- Save images in RGB color mode (not CMYK)
- Use descriptive file names (e.g., "wordpress-tutorial.jpg" instead of "IMG_1234.jpg")
- Consider using WebP format for even better compression (requires plugin support)
Common Questions
Blurry images are usually caused by uploading images that are too small. Make sure your image is at least 1280 x 600 pixels. If you've already uploaded a smaller image:
- Replace it with a larger, higher-quality version
- Use a plugin like "Regenerate Thumbnails" to recreate image sizes
- Ensure you're not over-compressing images before upload
Blog Layouts & Archives
BeBuddy offers flexible blog layouts and archive settings to help you create the perfect blog experience. Customize how your blog posts are displayed on archive pages, category pages, and your blog homepage.
What Are Blog Archives?
Blog archives are pages that display multiple posts in a list or grid format. These include:
- Blog: Your main blog page showing recent posts
- Category Archives: Posts from a specific category
- Tag Archives: Posts with a specific tag
- Date Archives: Posts from a specific month or year
- Author Archives: Posts by a specific author
- Search Results: Posts matching a search query
Configuring Blog Archive Settings
BeBuddy provides comprehensive blog archive settings in the Theme Options panel:
- Go to wp-admin > BeBuddy > Theme Options > Blog
- Configure the following settings:
- Page Template: Choose sidebar position (Full Width, Left Sidebar, Right Sidebar)
- Archive Layout: Select display style (Grid, List, or Classic)
- Click Save Changes
Available Archive Layouts
BeBuddy offers three distinct archive layouts:
Grid Layout
- Posts displayed in a multi-column grid (typically 2-3 columns)
- Shows featured image, title, excerpt, and meta information
- Modern, visual-first design
- Best for: Image-heavy blogs, portfolios, lifestyle content
List Layout
- Posts displayed in a single-column list format
- Featured image on the left, content on the right
- Clean, organized presentation
- Best for: News sites, professional blogs, content-focused sites
Classic Layout
- Traditional blog layout with full-width posts stacked vertically
- Featured image above, followed by title, excerpt, and meta
- Familiar, easy-to-read format
- Best for: Traditional blogs, long-form content, storytelling
Setting Your Blog Archive Page
WordPress requires you to designate a page to display your blog posts archive. This page will show all your blog posts in chronological order.
How to Set Your Blog Page
- Go to wp-admin > Settings > Reading
- Under Your homepage displays, select A static page
- For Posts page, select the page you want to use for your blog archive (e.g., "Blog")
- Click Save Changes
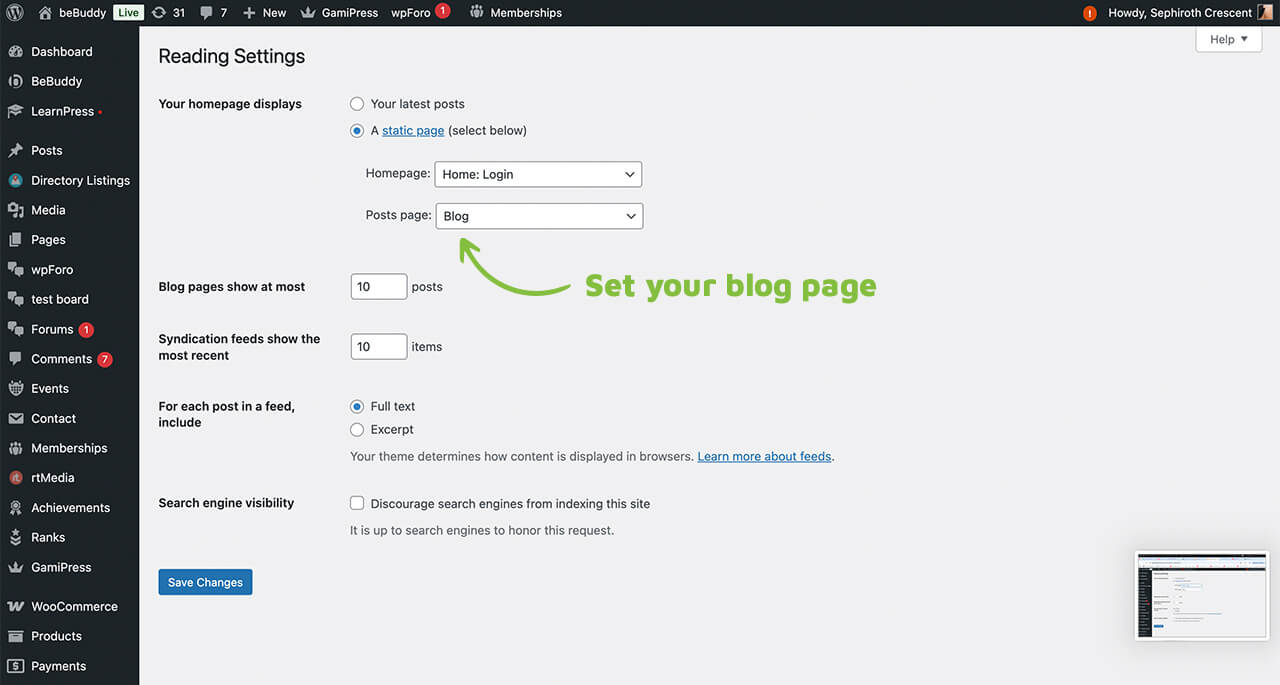
Once set, you can customize how this archive page displays by going to wp-admin > BeBuddy > Theme Options > Blog to select the page template (Full Width, Left Sidebar, Right Sidebar) and archive layout (Grid, List, Classic).
Note: If you ran the Setup Wizard, a blog page titled "Blog" has already been created and configured for you. You can customize the page title and URL slug by editing this page at wp-admin > Pages > All Pages.
Common Questions
You can control this in two places:
- WordPress Settings: Go to Settings > Reading and change Blog pages show at most
- Theme Options: Check BeBuddy > Theme Options > Blog for any posts-per-page settings
Single Post Settings
Customize how individual blog posts are displayed on your site. Single post settings can be found in two locations:
- Global Settings: Go to wp-admin > BeBuddy > Theme Options > Blog to configure default settings for all posts
- Per-Post Settings: Edit any post to find post-specific options in the post editor sidebar
Global settings apply to all posts by default, while per-post settings allow you to override these defaults for individual posts.
Registration & Memberships
Control how users join your community and manage membership levels. BeBuddy supports both free registration and paid membership options.
User Registration
BeBuddy supports user registration through two primary methods, depending on your community's needs:
1. BuddyPress Registration (Free Community)
Use BuddyPress registration if you're running a free community where anyone can join without payment or content restrictions.
When to Use BuddyPress Registration
- You want a free, open community
- No plans to charge users for registration
- No need to restrict access to site content or features
- Simple, straightforward registration process
All About the BuddyPress Registration
Enable/Disable User Registration
Go to wp-admin > Settings > General and make sure the Anyone can register checkbox is checked.
Customize Registration Page Title & Slug
You can change the registration page URL and title:
- Go to wp-admin > Settings > BuddyPress > URLs
- Find the Login Registration page setting
- Edit the page title and slug as needed
- Click Save Settings
The default title is "Register" and the default slug is "register" (appears as yoursite.com/register/).
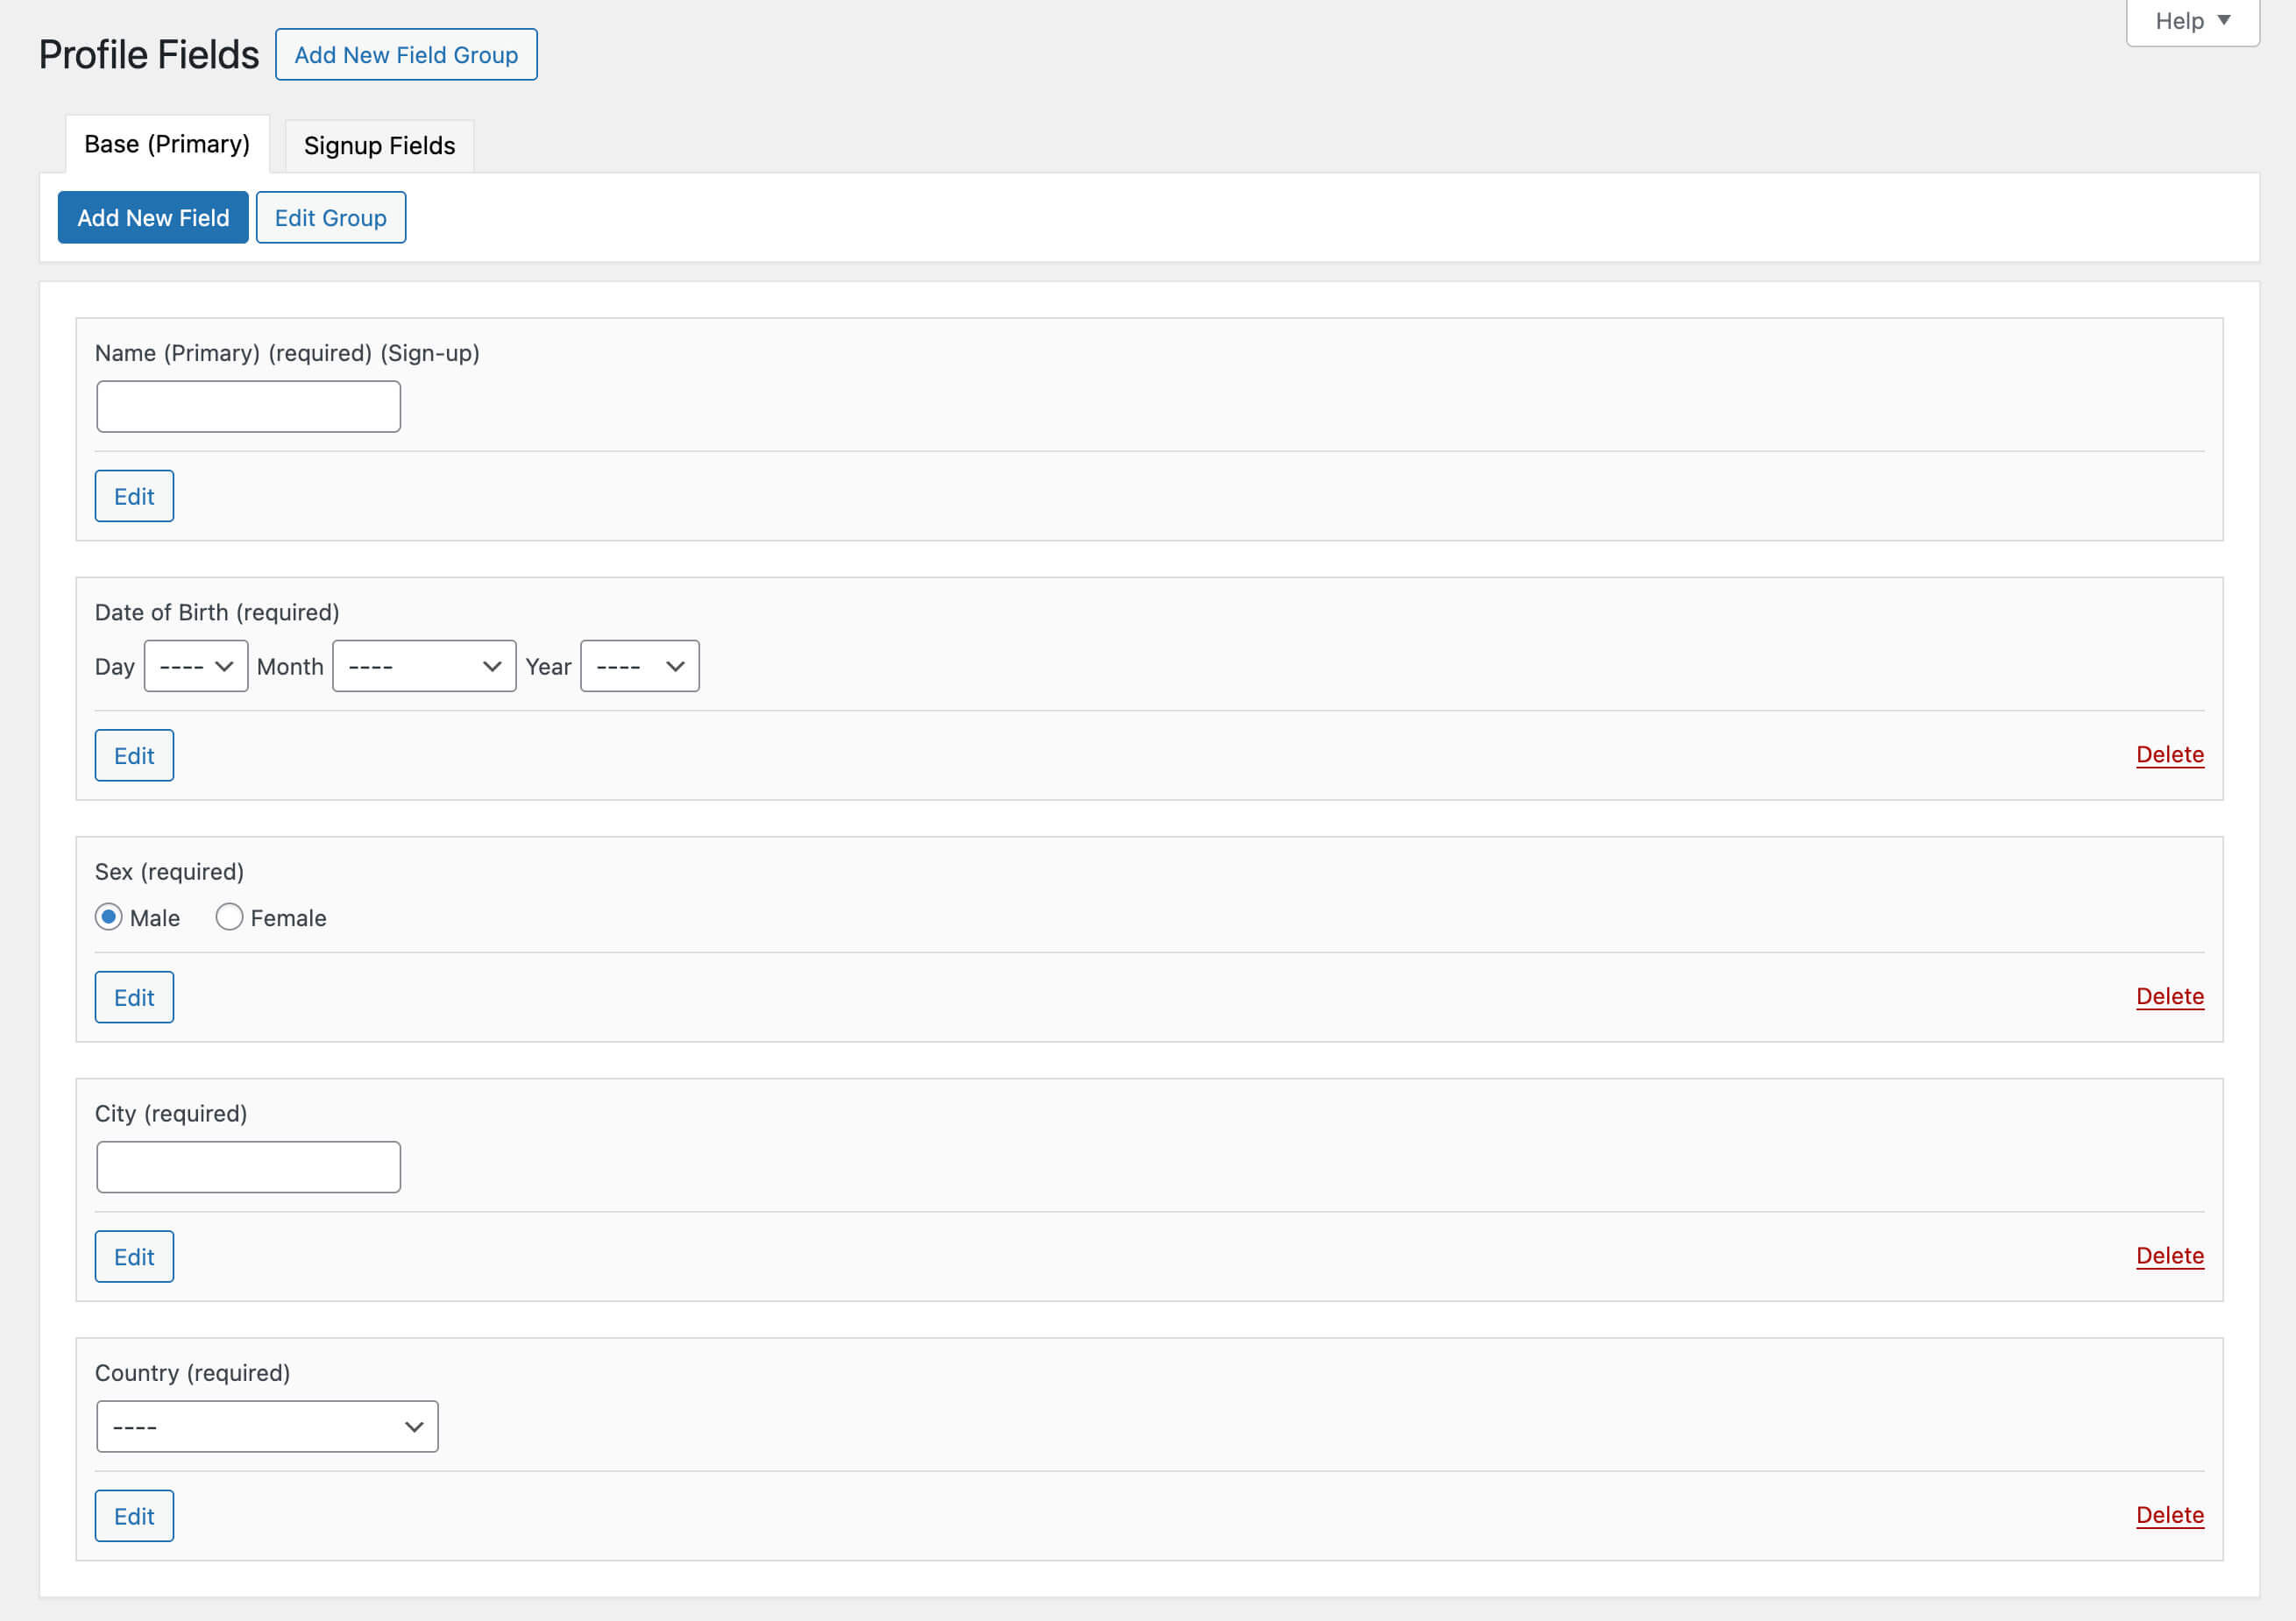
Configure Profile/Signup Fields
Customize what information users provide during registration:
- Make sure the Extended Profiles component is enabled at wp-admin > Settings > BuddyPress > Components
- Go to wp-admin > Users > Profile Fields
- You'll see default field groups (e.g., "Base", "Sign Up Fields")
- Add or edit fields in each group (text, dropdown, checkbox, etc.)
- Check Show on Signup to display fields during registration
Registration Process for Users
Once configured, users can register by:
- Visiting the registration page (e.g.,
yoursite.com/register/) - Filling out the registration form with required information
- Submitting the form
- Receiving an activation email
- Clicking the activation link to activate their account
- Logging in and completing their profile
Common Questions
Email activation provides basic protection, but you can add extra security with these plugins:
- Google reCAPTCHA: Advanced Google reCAPTCHA
- Cloudflare Turnstile: Simple Cloudflare Turnstile
2. Paid Memberships Pro Registration
Use Paid Memberships Pro if you want to charge for registration, offer membership tiers, or restrict content based on membership levels.
Note: If Paid Memberships Pro is active, the site will automatically use its registration system instead of BuddyPress registration.
Initial Setup
The Setup Wizard automatically configures Paid Memberships Pro pages and basic settings. You only need to create membership levels and configure payment gateways manually. This section shows you where to find and manage these settings.
Creating Membership Levels
Membership levels define different tiers of access and pricing for your community:
- Go to wp-admin > Memberships > Settings > Levels
- Click Add New Level
- Configure the following sections:
- General Information: Name, description (leave empty), confirmation message, and membership account message
- Billing Details: Set as free or paid. For paid levels, enter the price and configure recurring payment options
- Expiration Settings: Define when/if the membership expires
- Content Settings: Protect content by WordPress post categories and individual posts
- Click Save Level
Important: To protect specific site features and actions (exclusive to BeBuddy), see the Feature Restrictions section.
Discount Codes
Create discount codes for membership purchases at wp-admin > Memberships > Settings > Discount Codes.
Page Setup
Verify that required Paid Memberships Pro pages are configured at wp-admin > Memberships > Settings > Pages. The Setup Wizard creates these automatically, but you can check or modify them here.
Payment Gateway Setup
Configure your payment gateway to accept payments:
- Go to wp-admin > Memberships > Settings > Payments
- Select your payment gateway (PayPal, Stripe, etc.)
- Enter your API keys and credentials
- Configure payment settings
- Click Save Settings
Custom Signup Fields
Add custom fields to the registration form at wp-admin > Memberships > Settings > User Fields.
Important: Paid Memberships Pro registration field data does not automatically appear in BuddyPress profiles. Manual mapping requires custom coding. If you need this functionality, please contact support.
Common Questions
Paid Memberships Pro supports PayPal, Stripe, Authorize.net, Braintree, and many others. Configure your gateway at wp-admin > Memberships > Settings > Payments.
For a complete list of supported gateways, see: Payment Gateway Options
Most payment gateways offer test/sandbox modes. Enable test mode in your gateway settings at Memberships > Settings > Payments, then use test credit card numbers to simulate transactions.
For detailed testing instructions, see the official guide: Payment Testing Guide
3. Plugin-Specific Registration
If you're not using BuddyPress or Paid Memberships Pro, and instead using BeBuddy for standalone features like forums, listings, courses, shops, or crowdfunding, you can configure registration through each plugin's settings.
Forums (wpForo)
Settings: wp-admin > wpForo > Settings > Login & Registration
For detailed documentation, see: wpForo Login & Registration Guide
Listings (Directorist)
Settings: wp-admin > Directorist > Settings > User > Registration Form
Page Setup: wp-admin > Directorist > Page Setup > Sign In & Signup Page
The page must contain the [directorist_signin_signup] shortcode.
For detailed documentation, see: Directorist Login & Registration Guide
Courses (LearnPress)
Settings: wp-admin > LearnPress > Settings > Profile
Page Setup: wp-admin > LearnPress > Settings > General > Profile Page
The page must contain the [learn_press_profile] shortcode.
For detailed documentation, see: LearnPress Settings Guide
Shop (WooCommerce)
Settings: wp-admin > WooCommerce > Settings > Accounts & Privacy
Page Setup: wp-admin > WooCommerce > Settings > Advanced > My Account
The page must contain the [woocommerce_my_account] shortcode.
For detailed documentation, see: WooCommerce Customer Accounts Guide
Crowdfunding (WP Crowdfunding)
Settings: wp-admin > Crowdfunding > Settings > Field Settings
Page Setup: wp-admin > Crowdfunding > Settings > WooCommerce Settings > Select Registration Page
The page must contain the [wpcf_registration] shortcode.
For detailed documentation, see: WP Crowdfunding Shortcodes Guide
Content & Feature Restrictions
Control what content and features users can access based on their membership level. This requires the Paid Memberships Pro plugin to be active.
Note: Membership levels are created at wp-admin > Memberships > Settings > Levels. See the Paid Memberships Pro section for details.
1. General Content Restrictions
Restrict access to individual posts, pages, and categories based on membership levels:
- Edit any post, page, or category
- Find the Require Membership meta box in the sidebar
- Select which membership levels can access this content
- Save or update
2. Feature Restrictions (BeBuddy Exclusive)
BeBuddy provides advanced feature restrictions that go beyond standard content protection. You can control specific community actions and features based on membership levels.
How Feature Restrictions Work
Feature restrictions work in two steps:
- Enable Restrictions Globally: First, enable the restrictions you want to use at wp-admin > BeBuddy > Theme Options > Memberships > Restrictions & Options. This restricts the feature for all users by default.
- Grant Access Per Level: Then, grant access to specific membership levels at wp-admin > BeBuddy > Theme Options > Memberships > [Level Name].
Important: Checking a restriction checkbox restricts that feature for everyone. You must then explicitly grant access to specific membership levels.
Step 1: Enable Global Restrictions
Go to wp-admin > BeBuddy > Theme Options > Memberships > Restrictions & Options and check the features you want to restrict:

- Restrict posting to activity feed - Prevent users from posting to the global activity stream
- Restrict media uploads in activity - Block photo, video, and audio uploads in activity posts
- Restrict commenting on activity posts - Disable activity comments and replies
- Restrict sending friend requests - Prevent users from sending friend requests
- Restrict private messaging - Block private messages between users
- Restrict group creation - Prevent users from creating new groups
- Restrict joining groups - Block users from joining existing groups
- Restrict access to forum boards - Control which forum boards users can access
- Enable membership cart discounts - Allow membership-based WooCommerce discounts
- Restrict directory listing submissions - Control who can submit directory listings
- Restrict free course enrollments - Limit access to free LearnPress courses
- Restrict event submissions - Control who can create events
- Restrict fundraiser submissions - Limit crowdfunding campaign creation
Step 2: Grant Access to Membership Levels
After enabling restrictions globally, grant access to specific membership levels:
- Go to wp-admin > BeBuddy > Theme Options > Memberships
- Select a membership level tab (e.g., "Premium", "Gold", etc.)
- Configure which features this level can access
- Click Save Changes
- Repeat for each membership level
Available Feature Permissions Per Level
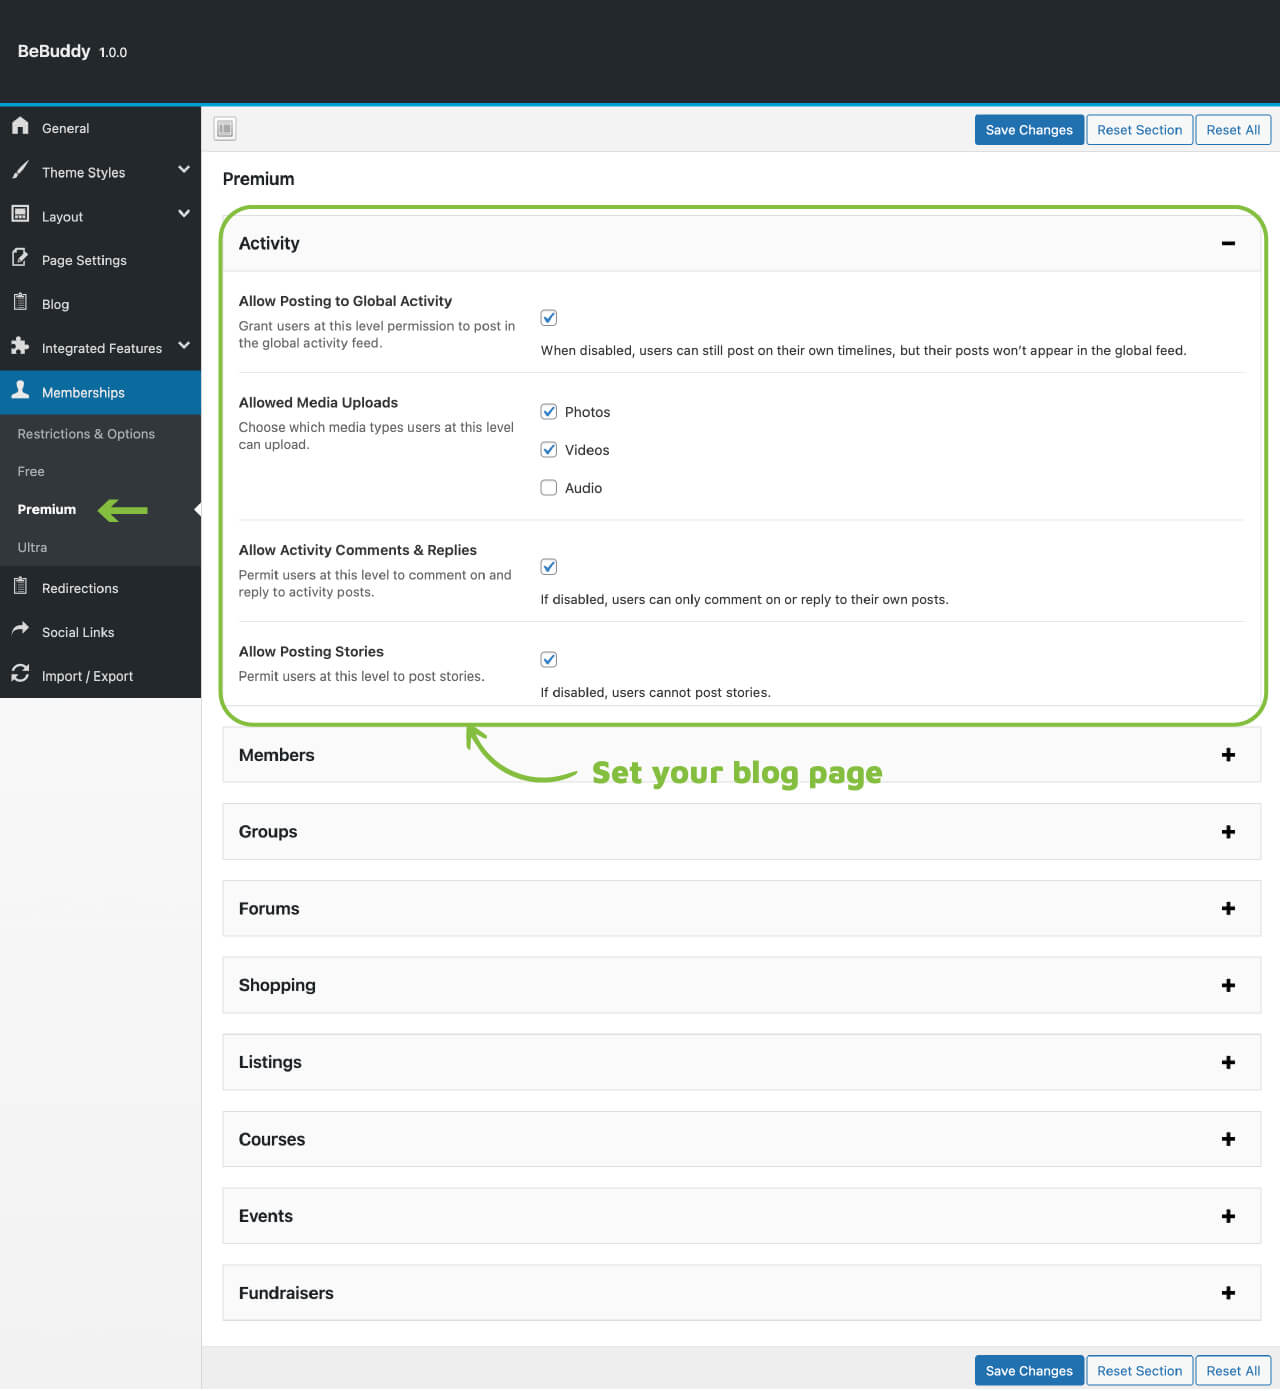
Activity
- Allow posting to global activity - Let users post to the activity stream
- Allowed media uploads - Enable photo, video, and/or audio uploads
- Allow Activity Comments & Replies - Enable commenting on activity posts
- Allow story posting - Enable story creation
Members
- Allow friend requests - Enable sending friend requests
- Friend limit - Set maximum number of friends (if friend requests are allowed)
- Messaging permission - Choose who users can message (Only Friends / Everyone)
Groups
- Allow Group Creation - Enable creating new groups
- Allow Group Joining - Enable joining existing groups
Forums
- Allow Forum Board Access - Select which forum boards this level can access (multiselect)
Shopping
- Membership Discount - Set a discount percentage for WooCommerce purchases
Listings
- Allow Listing Submission - Enable directory listing submissions
- Monthly Listing Limit - Set maximum listings per month (if submissions are allowed)
Courses
- Allow Free Course Enrollment - Enable enrolling in free LearnPress courses
Events
- Allow Event Submission - Enable creating events
Fundraisers
- Allow Crowdfunding Campaign Submission - Enable creating fundraising campaigns
AI Chatbot
- Allow chatting with AI assistant - Enable access to AI chatbot feature
Example Use Case
Scenario: You want to offer a free membership with limited features and a premium membership with full access.
- Enable all restrictions at Restrictions & Options
- Go to Memberships > Free Level and enable only basic features (e.g., activity posting, joining groups)
- Go to Memberships > Premium Level and enable all features
- Free users will have limited access, while premium users get full access
Common Questions
Need More Membership Features?
Paid Memberships Pro offers additional add-ons to extend functionality beyond what's included by default. Explore available options: Paid Memberships Pro Add-Ons
Pricing Table Setup
Display your membership levels in an attractive pricing table to help users compare plans and choose the right membership for them.
Using the PMPro Pricing Table Widget
BeBuddy includes a pre-built "Membership Levels" page that you can customize:
- Go to wp-admin > Pages > All Pages
- Find and edit the Membership Levels page
- Click Edit with Elementor
- Locate the PMPro Pricing Table widget on the page
- Click on the widget to open its settings
- Customize the following:
- Feature List: Add or edit features for each membership level
- Highlighted Plan: Mark a plan as "Popular"
- Click Update to save your changes

The PMPro Pricing Table widget in Elementor with customization options
Common Questions
Integrated Features
BeBuddy seamlessly integrates with popular WordPress plugins to provide powerful community, e-commerce, learning, and event management features.
Each integrated feature is designed to work harmoniously with BeBuddy's community-focused design. The following sections cover the key features available and how to configure them.
Community Page Template
By default, all integrated features use the Community Page Template for a consistent user experience. This template is optimized for user-generated content and provides a unified look across your site.
To disable the Community Page Template for specific features:
- Go to wp-admin > BeBuddy > Theme Options > Integrated Features > General
- Uncheck the features you want to use with a different template
- Click Save Changes
Note: Each feature section below includes links to official plugin documentation for detailed configuration options.
Activity Stream
The activity stream is the heart of your community, displaying real-time updates from members including posts, comments, group activities, and more. It's powered by BuddyPress and enhanced with media capabilities from rtMedia.
What is the Activity Stream?
The activity stream shows:
- Member status updates and posts
- Group activities and discussions
- Friendship connections
- Media uploads (photos, videos, audio)
- Comments and replies
- Stories (temporary posts)
BeBuddy Activity Settings
Configure BeBuddy-specific activity features at wp-admin > BeBuddy > Theme Options > Integrated Features > Activity.
BuddyPress Activity Settings
Core activity settings are managed at wp-admin > Settings > BuddyPress > Settings:
- Activity Auto-Refresh: Automatically load new activity updates
- Activity Commenting: Enable/disable comments on activity posts
rtMedia Settings
Media upload settings are configured at wp-admin > rtMedia > Settings:
- Allowed Media Types: Choose which file types users can upload
- Upload Limits: Set maximum file sizes
- Privacy Settings: Control media visibility
For detailed BuddyPress activity documentation, see: BuddyPress Activity Streams Guide
For rtMedia documentation, see: rtMedia Documentation
Common Questions
Members
The Members feature displays your community members in a searchable directory and provides customizable member profiles. It's powered by BuddyPress.
Members Directory
The Members Directory shows all registered users in a filterable, searchable list. Members can browse profiles, send friend requests, and connect with each other.
Directory Features:
- Search members by name or username
- Filter by member type, activity, or alphabetically
- View member avatars and basic information
- Send friend requests directly from the directory
Member Profiles
Each member has a customizable profile page displaying:
- Profile information and custom fields
- Activity timeline
- Friends list
- Groups they've joined
- Media uploads
Member Types
Organize members into different types (e.g., "Students", "Teachers", "Professionals") for better categorization and filtering.
Manage member types at wp-admin > Users > Member Types.
Note: BuddyPress does not provide a built-in registration or profile field for member types. Currently, member types must be assigned manually by administrators. We are working on adding a custom field for member type selection during registration and profile editing in a future update.
BeBuddy Members Settings
Configure BeBuddy-specific member features at wp-admin > BeBuddy > Theme Options > Integrated Features > Members.
BuddyPress Members Settings
Core member settings are managed at wp-admin > Settings > BuddyPress > Options:
- Profile Visibility: Control who can view member profiles
- Avatar Uploads: Enable/disable custom profile pictures
- Cover Images: Allow profile cover photos
- Profile Fields: Manage custom profile fields at Users > Profile Fields
Managing Members
View and manage all site members at wp-admin > Users. From here you can:
- Edit user profiles and roles
- Delete or suspend members
- Assign member types
- View member statistics
For detailed BuddyPress members documentation, see: BuddyPress Members Guide
Common Questions
Groups
Groups allow members to organize around common interests, projects, or topics. Members can create groups, join existing ones, and collaborate through group activity streams, discussions, and shared media. Groups are powered by BuddyPress.
What are Groups?
Groups provide a space for members to:
- Create public, private, or hidden groups
- Post updates and share media within the group
- Invite members and manage group membership
- Organize group forums and discussions
- Assign group administrators and moderators
Group Privacy Levels
- Public: Anyone can see the group, its members, and content. Anyone can join.
- Private: Anyone can see the group and who's in it, but only members can see content. Users must request to join.
- Hidden: Only members can see the group and its content. Users must be invited to join.
Group Types
Organize groups into different types (e.g., "Study Groups", "Sports Teams", "Professional Networks") for better categorization and filtering.
Manage group types at wp-admin > Groups > Group Types. Group creators can select a type when creating or editing a group.
BeBuddy Groups Settings
Configure BeBuddy-specific group features at wp-admin > BeBuddy > Theme Options > Integrated Features > Groups.
BuddyPress Groups Settings
Core group settings are managed at wp-admin > Settings > BuddyPress > Options:
- Group Creation: Control who can create groups (all members or admins only)
- Activity Deletion: Allow administrators and group moderators to delete activity posts
For detailed BuddyPress groups documentation, see: BuddyPress Groups Guide
Common Questions
Forums
Forums provide a structured discussion platform where members can create topics, reply to threads, and engage in organized conversations. Forums are powered by the wpForo plugin.
What are Forums?
Forums allow your community to:
- Create discussion topics organized by categories and boards
- Reply to topics and participate in threaded conversations
- Subscribe to topics for email notifications
- Search forum content
- Moderate discussions with forum moderators
- Integrate with BuddyPress groups (optional)
Creating Forums
Forum boards are created by administrators at wp-admin > wpForo > Forums. Regular users cannot create forum boards but can create topics within existing boards.
Forum Structure:
- Categories: Top-level organization (e.g., "General Discussion", "Support")
- Forums: Discussion boards within categories (e.g., "Getting Started", "Technical Help")
- Topics: Individual discussion threads created by members
- Posts: Replies within topics
wpForo Settings
Configure forum settings at wp-admin > wpForo > Settings:
- General Settings: Forum layout, topics per page, post permissions
- User Groups: Define user roles and permissions for forums
- Login & Registration: Configure forum-specific login options
- Spam Protection: Protect your forum from spammers
- Email Notifications: Configure email settings for subscriptions
For detailed wpForo documentation, see: wpForo Documentation
Common Questions
Events
Events allow members to create, manage, and attend community events. Members can RSVP, book tickets, and receive event notifications. Events are powered by the Events Manager plugin.
What are Events?
Events enable your community to:
- Create and publish events with dates, times, and locations
- Manage event bookings and RSVPs
- Organize events by categories
- Set up recurring events
- Create group-specific events (if using BuddyPress Groups)
- Display events in calendars and lists
Creating Events
Administrators can create events at wp-admin > Events > Add New.
Event Components:
- Events: Individual event entries with details, dates, and locations
- Categories: Organize events by type at wp-admin > Events > Event Categories
- Locations: Create reusable venue locations at wp-admin > Events > Locations
User Event Submission
Allow regular members to submit their own events. This requires two configurations:
1. Enable User Capabilities
Go to wp-admin > Events > Settings > General > User Capabilities and ensure the following are checked:
- Edit Events - Allows users to create and edit their own events
- Delete Events - Allows users to delete their own events
Setup Wizard: If you ran the Setup Wizard, these capabilities are already enabled.
2. Set Event Submission Page
Configure the event submission form page:
- Create a page with the
[event_form]shortcode (or use the pre-built "Submit Event" page) - Go to wp-admin > BeBuddy > Theme Options > Integrated Features > Events
- Select the page with the event form shortcode
- Click Save Changes
Members can now submit events from the frontend using this page.
Events Manager Settings
Configure event settings at wp-admin > Events > Settings:
- General Settings: Event submission permissions, default settings
- Pages: Configure event-related pages
- Formatting: Date/time formats, event display options
- Bookings: RSVP and ticketing settings
- Emails: Notification email templates
Page Setup
Configure event pages at wp-admin > Events > Settings > Pages.
BuddyPress Integration: If you're using BuddyPress, you can leave the following pages empty: My Bookings, Edit Events, Edit Locations, and Manage Bookings. Users can perform these actions directly from their BuddyPress profiles instead.
BeBuddy Events Settings
Configure BeBuddy-specific event features at wp-admin > BeBuddy > Theme Options > Integrated Features > Events.
Setup Wizard: If you ran the Setup Wizard, all event settings and page configurations are already set up for you.
For detailed Events Manager documentation, see: Events Manager Documentation
Common Questions
Payment Gateways: To accept payments for paid events, you need either the Events Manager Pro version or the Events Manager for WooCommerce addon by the plugin author.
Listings
Listings allow members to create and browse directory entries such as business listings, classifieds, job postings, and more. Listings are powered by the Directorist plugin.
What are Listings?
Listings enable your community to:
- Submit business listings, classifieds, or job postings
- Browse and search directory entries
- Organize listings by categories and locations
- Add photos, videos, and contact information
- Rate and review listings
- Create multiple directory types (e.g., Businesses, Jobs, Classifieds)
Creating Listings
Administrators can create listings at wp-admin > Directory Listings > Add New Listing.
Listing Components:
- Listings: Individual directory entries with details and media
- Categories: Organize listings by type at wp-admin > Directory Listings > Categories
- Locations: Organize listings by location at wp-admin > Directory Listings > Locations
User Listing Submission
Allow members to submit their own listings:
- Create a page with the
[directorist_add_listing]shortcode (or use the pre-built "Add Listing" page) - Go to wp-admin > Directory Listings > Settings > Page Setup
- Select the page with the add listing shortcode
- Click Save Changes
Setup Wizard: If you ran the Setup Wizard, the listing submission page is already configured.
Multi-Directory Types
Create multiple directory types (e.g., Business Listings, Jobs, Classifieds) with different fields and layouts:
Enable Multi-Directory
- Go to wp-admin > Directory Listings > Settings > Listing > General
- Enable Multi-Directory
- Click Save Changes
Create Directory Types
- Go to wp-admin > Directory Listings > Directory Builder
- Create or edit directory types (e.g., "Jobs", "Real Estate", "Classifieds")
- Configure custom fields, layouts, and settings for each type
- Save your changes
Setup Wizard: If you ran the Setup Wizard, multi-directory is already enabled with pre-configured directory types.
Directorist Settings
Configure listing settings at wp-admin > Directory Listings > Settings:
- General Settings: Listing submission, moderation, default settings
- Page Setup: Configure listing-related pages
- Search & Filter: Search options and filters
- User Settings: User registration and profile options
- Email Notifications: Configure email templates
Paid Listings
To accept payments for featured or premium listings, you need payment gateway add-ons:
- Directorist PayPal - Accept payments via PayPal
- Directorist Stripe - Accept payments via Stripe
For detailed Directorist documentation, see: Directorist Documentation
Common Questions
Courses
Courses allow you to create and sell online learning content. Members can enroll in courses, complete lessons and quizzes, and track their progress. Courses are powered by the LearnPress plugin.
What are Courses?
Courses enable your community to:
- Create and publish online courses with lessons and quizzes
- Enroll in free or paid courses
- Track learning progress and completion
- Earn certificates upon course completion
- Rate and review courses
- Organize courses by categories
Creating Courses
Administrators and authorized instructors can create courses at wp-admin > LearnPress > Courses > Add New.
Course Components:
- Courses: Main course container with curriculum and settings
- Lessons: Individual learning units within a course at wp-admin > LearnPress > Lessons
- Quizzes: Assessments to test student knowledge at wp-admin > LearnPress > Quizzes
- Categories: Organize courses by topic at wp-admin > LearnPress > Categories
Becoming an Instructor
Regular users can apply to become instructors:
- Users submit the "Become a Teacher" form (available on the pre-built page)
- Site administrators review and approve instructor applications
- Authorized instructors can create and manage courses from the WordPress admin panel
Note: Only approved instructors can create courses. Regular members can only enroll in and take courses.
LearnPress Settings
Configure course settings at wp-admin > LearnPress > Settings:
- General Settings: Course archive, enrollment options
- Courses: Course display and completion settings
- Profile: Student and instructor profile settings
- Payments: Payment gateway configuration
- Emails: Email notification templates
Setup Wizard: If you ran the Setup Wizard, all page setup and settings are already configured.
Payment Gateways
Accept payments for paid courses:
- PayPal: Built-in PayPal integration at wp-admin > LearnPress > Settings > Payments
- Stripe: Requires the Stripe Add-on for LearnPress
For detailed LearnPress documentation, see: LearnPress Documentation
Common Questions
Shop
The Shop feature allows you to sell physical or digital products directly from your community site. Members can browse products, add items to cart, and complete purchases. The shop is powered by WooCommerce.
What is the Shop?
The shop enables your community to:
- Sell physical and digital products
- Manage inventory and orders
- Accept payments via multiple gateways
- Offer discounts and coupons
- Track sales and revenue
- Provide membership-based discounts
Creating Products
Administrators can create products at wp-admin > Products > Add New.
Product Components:
- Products: Individual items for sale with pricing and details
- Categories: Organize products by type at wp-admin > Products > Categories
- Tags: Add searchable tags at wp-admin > Products > Tags
WooCommerce Settings
Configure shop settings at wp-admin > WooCommerce > Settings:
- General: Store address, currency, and selling locations
- Products: Shop page, inventory, and downloadable products
- Shipping: Shipping zones, methods, and rates
- Payments: Payment gateway configuration
- Accounts & Privacy: Customer account settings
Setup Wizard: If you ran the Setup Wizard, all page setup and basic settings are already configured.
Membership Discounts
If you're using Paid Memberships Pro, you can offer membership-based discounts:
- Go to wp-admin > BeBuddy > Theme Options > Memberships > Restrictions & Options
- Enable Enable membership cart discounts
- Go to Memberships > [Level Name] under the Shopping section
- Set a discount percentage for each membership level
- Click Save Changes
For detailed WooCommerce documentation, see: WooCommerce Documentation
Common Questions
Fundraisers
Fundraisers allow members to create and manage crowdfunding campaigns to raise money for causes, projects, or personal needs. Supporters can contribute to campaigns and track funding progress. Fundraisers are powered by the WP Crowdfunding plugin.
What are Fundraiser Campaigns?
Fundraiser campaigns enable your community to:
- Create crowdfunding campaigns with funding goals and deadlines
- Accept contributions from supporters
- Track funding progress with visual progress bars
- Offer rewards or perks to backers
- Organize campaigns by categories
Creating Campaigns
Fundraiser campaigns are created as a special WooCommerce product type called "Crowdfunding." The process is similar to creating WooCommerce products.
Administrators can create campaigns at wp-admin > Products > Add New, then select Crowdfunding as the product type.
User Campaign Submission
Allow members to submit their own fundraising campaigns:
- A page with the
[wpcf_form]shortcode is used for campaign submission - Configure the submission page at wp-admin > WP Crowdfunding > Settings > General Settings
- Select the page with the campaign form shortcode
- Click Save Changes
Setup Wizard: If you ran the Setup Wizard, the campaign submission page is already configured.
BeBuddy Fundraiser Settings
Configure BeBuddy-specific fundraiser features at wp-admin > BeBuddy > Theme Options > Integrated Features > Fundraiser:
- Search Page Setup: Configure the campaign search page
- Categories Page Setup: Configure the campaign categories page
WP Crowdfunding Settings
Configure campaign settings at wp-admin > WP Crowdfunding > Settings:
- General Settings: Campaign submission, approval, and display options
- Campaign Settings: Funding goals, deadlines, and reward options
- Email Settings: Notification email templates
Setup Wizard: If you ran the Setup Wizard, all page setup and settings are already configured.
Payment Gateways
WP Crowdfunding uses WooCommerce payment gateways for processing contributions. Configure payment gateways at wp-admin > WooCommerce > Settings > Payments. All WooCommerce-compatible payment gateways will work with fundraiser campaigns.
For detailed WP Crowdfunding documentation, see: WP Crowdfunding Documentation
Common Questions
Gamification
Gamification adds game-like elements to your community to increase engagement, reward participation, and motivate members. It's powered by GamiPress.
Gamification enables you to:
- Award points for community activities (posting, commenting, sharing)
- Create achievements (badges) for completing specific tasks
- Establish rank systems for user progression
- Display leaderboards to encourage friendly competition
- Motivate members to participate more actively
GamiPress works seamlessly with BeBuddy and all integrated plugins. The following sections explain how to configure each gamification component.
For detailed GamiPress documentation, see: GamiPress Documentation
Points
Points are virtual currency that members earn by performing activities on your site. You can create multiple point types (e.g., "Credits", "Karma", "XP") and award them for different actions.
What are Points?
Points allow you to:
- Reward members for contributions (posts, comments, logins)
- Create multiple point types for different purposes
- Set point values for specific actions
- Deduct points for negative actions (optional)
- Display point balances on member profiles
Creating Point Types
Create and manage point types at wp-admin > GamiPress > Points Types:
- Click Add New
- Enter a singular name (e.g., "Credit") and plural name (e.g., "Credits")
- Set a slug (e.g., "credits")
- Upload an image to represent this point type (optional)
- Click Add New Points Type
Awarding Points
Configure how members earn points:
- Go to wp-admin > GamiPress > Points Types
- Click on a point type to edit it
- Scroll to Points Awards
- Click Add New Points Award
- Select an activity (e.g., "Publish a post", "Write a comment")
- Set the number of points to award
- Configure any additional conditions
- Click Update
Deducting Points
You can also deduct points for specific actions:
- In the Points Deducts section, click Add New Points Deduct
- Select an activity (e.g., "Delete a post")
- Set the number of points to deduct
- Click Update
For detailed points configuration, see: GamiPress Points Documentation
Common Questions
Achievements
Achievements are badges or awards that members earn by completing specific tasks or reaching milestones. They provide visual recognition of accomplishments and encourage members to explore different features.
What are Achievements?
Achievements allow you to:
- Reward members for completing specific tasks
- Create multiple achievement types (e.g., "Badges", "Trophies")
- Set unlock requirements (single action or multiple steps)
- Display earned achievements on member profiles
- Encourage exploration of community features
Creating Achievement Types
First, create achievement types at wp-admin > GamiPress > Achievement Types:
- Click Add New
- Enter a singular name (e.g., "Badge") and plural name (e.g., "Badges")
- Set a slug (e.g., "badges")
- Click Add New Achievement Type
Creating Achievements
Create individual achievements:
- Go to wp-admin > GamiPress > [Achievement Type] (e.g., Badges)
- Click Add New
- Enter a title (e.g., "First Post")
- Add a description
- Upload an achievement image (badge icon)
- Set unlock requirements in the Requirements section
- Click Publish
Setting Requirements
Configure how members unlock achievements:
- In the Requirements section, click Add New Requirement
- Select an activity (e.g., "Publish a post")
- Set the count (e.g., "1 time" for first post, "10 times" for veteran)
- Add multiple requirements for complex achievements
- Choose whether users must complete All or Any requirements
For detailed achievements configuration, see: GamiPress Achievements Documentation
Common Questions
Ranks
Ranks represent user progression levels based on accumulated points or completed achievements. Members automatically advance through ranks as they meet requirements, providing a clear path of progression.
What are Ranks?
Ranks allow you to:
- Create progression levels (e.g., "Newbie", "Member", "Veteran", "Expert")
- Set requirements based on points or achievements
- Automatically promote users as they meet requirements
- Display rank badges on member profiles
- Recognize long-term community contributions
Creating Rank Types
First, create rank types at wp-admin > GamiPress > Rank Types:
- Click Add New
- Enter a singular name (e.g., "Rank") and plural name (e.g., "Ranks")
- Set a slug (e.g., "ranks")
- Click Add New Rank Type
Creating Ranks
Create individual ranks in progression order:
- Go to wp-admin > GamiPress > [Rank Type] (e.g., Ranks)
- Click Add New
- Enter a rank title (e.g., "Bronze Member")
- Add a description
- Upload a rank image (badge icon)
- Set the Priority (lower numbers = lower ranks)
- Set unlock requirements
- Click Publish
Setting Requirements
Configure how members achieve ranks:
- In the Requirements section, click Add New Requirement
- Select a requirement type:
- Earn Points: Require a specific point balance
- Earn Achievement: Require specific achievements
- Reach Rank: Require a previous rank
- Set the required amount or achievement
- Add multiple requirements if needed
Tip: Create your lowest rank first with no requirements (default rank for new users), then create higher ranks in order with increasing requirements.
For detailed ranks configuration, see: GamiPress Ranks Documentation
Common Questions
Display Rewards
BeBuddy provides custom Elementor widgets to beautifully display gamification rewards throughout your site. These widgets are pre-configured by the Setup Wizard but can be customized to match your design.
Reward Pages
The Setup Wizard automatically creates three reward pages, each featuring a dedicated BeBuddy Elementor widget:
- Rewards: Points - Displays all point types using the (BeBuddy) Points Types widget
- Rewards: Achievements - Displays all achievements using the (BeBuddy) Achievements widget
- Rewards: Ranks - Displays all ranks using the (BeBuddy) Ranks widget
Setup Wizard: If you ran the Setup Wizard, these pages are already created and configured with the appropriate widgets.
Customizing Reward Pages
To customize how rewards are displayed:
- Go to wp-admin > Pages > All Pages
- Find the reward page you want to edit (e.g., "Rewards: Points")
- Click Edit with Elementor
- Click on the BeBuddy reward widget to open its settings
- Customize the display options:
- Layout and columns
- Colors and styling
- Sorting and filtering options
- Click Update to save your changes
Displaying User Balances
User point balances, achievements, and ranks are automatically displayed on member profiles using the (Buddy Bridge) About Member widget.
This widget is assigned to the Member Profile Left widget area by the Setup Wizard and shows:
- Current point balances for all point types
- Earned achievements
- Current rank
Adding Reward Widgets to Other Pages
You can add BeBuddy reward widgets to any page:
- Edit a page with Elementor
- Search for "BeBuddy" in the widget panel
- Drag one of the reward widgets to your page:
- (BeBuddy) Points Types - Display point types
- (BeBuddy) Achievements - Display achievements
- (BeBuddy) Ranks - Display ranks
- Configure the widget settings
- Click Update
Widget Areas
You can also add gamification widgets to widget areas:
- Go to wp-admin > Appearance > Widgets
- Select a widget area (e.g., "Member Profile Left", "Sidebar")
- Add the (Buddy Bridge) About Member widget to display user rewards
- Configure the widget settings
- Click Save
Translation & Localization
BeBuddy is fully translation-ready, allowing you to translate your site into any language using Loco Translate. For true multilingual sites with language switchers, WPML support is coming soon.
Available Translation Methods
- Loco Translate - Free plugin for translating themes and plugins directly from your WordPress dashboard
- WPML - Premium multilingual plugin with advanced features
Translating with Loco Translate
Loco Translate is a powerful, free plugin that makes translating BeBuddy and its components straightforward. It provides an intuitive interface for managing translations directly from your WordPress dashboard.
Installing Loco Translate
- Go to wp-admin > Plugins > Add New
- Search for "Loco Translate"
- Click Install Now on the "Loco Translate" plugin by Tim Whitlock
- Click Activate
Plugin Link: Loco Translate on WordPress.org
Translating the BeBuddy Theme
Follow these steps to translate BeBuddy into your desired language:
- Go to wp-admin > Loco Translate > Themes
- Click on BeBuddy from the list
- Click + New language
- Select your language from the dropdown (e.g., "French", "Spanish", "German")
- Choose the location to save translations:
- Custom location (Recommended) - Survives theme and plugin updates
- System location - Standard WordPress location
- Click Start translating
- Translate the strings:
- Click on a source text in the left column
- Enter your translation in the text area
- Click Save or press Ctrl+S (Mac: Cmd+S)
- Continue translating all strings or use the search/filter to find specific text
- Click Save when finished
Translating Plugins
You can translate any plugin (bundled or integrated) using the same process:
- Go to wp-admin > Loco Translate > Plugins
- Find the plugin you want to translate (e.g., Buddy Bridge, StoryPress, BuddyPress, WooCommerce, LearnPress, etc.)
- Click on the plugin name
- Follow the same steps as translating the theme (steps 3-9 above)
Common Questions
- Create separate pages for each language
- Use a multilingual plugin like WPML that integrates with Elementor
- Manually edit content for each language
WPML Support
WPML (WordPress Multilingual Plugin) is a premium solution for creating fully multilingual websites with advanced features like language switchers, automatic translation, and content synchronization.
BeBuddy works with WPML for multilingual communities. For setup guidance, please check the official WPML getting started guide.
Plugins
BeBuddy includes bundled plugins and integrates with popular open-source plugins. This section covers the bundled plugins in detail, while open-source plugins link to their official documentation.
Bundled Plugins
These plugins are exclusively developed for BeBuddy and come bundled with the theme.
Buddy Bridge
Buddy Bridge is a powerful plugin that extends BuddyPress functionality and provides custom WordPress widgets and shortcodes for displaying community content.
Features
- Activity Hashtags - Enable hashtag functionality in activity posts
- Activity Reactions - Allow members to react to activity posts with emojis
- Activity Share - Share activity posts to sitewide activity, Facebook, X (Twitter), and LinkedIn
WordPress Widgets
Buddy Bridge provides the following WordPress widgets (available at wp-admin > Appearance > Widgets):
- (Buddy Bridge) About Group - Display group information
- (Buddy Bridge) About Member - Display member profile information
- (Buddy Bridge) Activity Hashtags - Display trending hashtags
- (Buddy Bridge) Activity List - Display activity stream
- (Buddy Bridge) Course Tags - Display course tags
- (Buddy Bridge) Featured Campaigns - Display featured fundraising campaigns
- (Buddy Bridge) User Balance - Display user point balances
- (Buddy Bridge) Group Types - Display group types
- (Buddy Bridge) Groups - Display groups directory
- (Buddy Bridge) Member Card - Display member card
- (Buddy Bridge) Member Photos - Display member photos
- (Buddy Bridge) Member Types - Display member types
- (Buddy Bridge) Members - Display members directory
- (Buddy Bridge) My Friends - Display user's friends
- (Buddy Bridge) My Groups - Display user's groups
- (Buddy Bridge) New Member Avatars - Display new member avatars
- (Buddy Bridge) Popular Posts - Display popular activity posts
Shortcodes
Buddy Bridge provides the following shortcodes:
[buddy_bridge_course_categories]- Display course categories[buddy_bridge_fundraiser_categories]- Display fundraiser categories[buddy_bridge_fundraiser_search_results]- Display fundraiser search results
StoryPress
StoryPress adds Instagram-style stories functionality to your BuddyPress activity directory, allowing members to share temporary content that disappears after 24 hours.
Features
- Text Stories - Create text-based stories with customizable backgrounds
- Photo Stories - Upload and share photo stories
- Video Stories - Upload and share video stories
Settings
Configure StoryPress settings at wp-admin > StoryPress:
Integrated Plugins
BeBuddy integrates seamlessly with these popular open-source plugins. For detailed documentation, please refer to their official resources:
Page Builder
- Elementor - Official Documentation
Community Features
- BuddyPress - Official Documentation
- rtMedia - Official Documentation
Forums
- wpForo - Official Documentation
Events
- Events Manager - Official Documentation
Listings
- Directorist - Official Documentation
Learning Management
- LearnPress - Official Documentation
- LearnPress Course Review - Official Documentation
- LearnPress Wishlist - Official Documentation
E-Commerce
- WooCommerce - Official Documentation
Crowdfunding
- WP Crowdfunding - Official Documentation
Memberships & Gamification
- Paid Memberships Pro - Official Documentation
- GamiPress - Official Documentation
Forms & Marketing
- Contact Form 7 - Official Documentation
- Mailchimp for WordPress - Official Documentation
Note: BeBuddy's integration with these plugins is covered in the Integrated Features section of this documentation.
Performance Optimization
Optimize your BeBuddy site for speed and performance with these safe, high-impact techniques. These recommendations are tested and won't break your site.
Note: BeBuddy is already optimized with minified CSS/JS and built-in lazy loading. These additional steps will further enhance your site's performance.
Why Performance Matters
- Better User Experience - Faster sites keep members engaged
- Improved SEO - Search engines favor fast-loading sites
- Higher Conversions - Speed directly impacts membership signups and engagement
- Reduced Server Load - Optimizations reduce hosting costs and improve stability
Recommended Optimization Steps
- Caching - Store static versions of pages to reduce server processing
- Image Optimization - Compress images without losing quality
- CDN Integration - Deliver content from servers closer to your users
Caching
Caching stores static versions of your pages, dramatically reducing server load and improving page load times. This is the single most impactful performance optimization you can implement.
Recommended Caching Plugins
Choose one of these trusted caching plugins:
1. LiteSpeed Cache (Free - Recommended)
- Best for: Users on LiteSpeed servers (including Hostinger, our recommended hosting provider)
- Price: Free
- Features: Page caching, object caching, image optimization, lazy loading, minification, CDN integration, database optimization, and more
- BuddyPress Compatible: Yes, with automatic exclusions for dynamic content
- Server Requirement: LiteSpeed web server (check with your hosting provider)
- Link: LiteSpeed Cache on WordPress.org
Recommended Setup: If you're using Hostinger or any LiteSpeed-powered hosting, LiteSpeed Cache is your best option. It's completely free and offers premium features that rival paid plugins. LiteSpeed servers are faster than traditional Apache or Nginx servers, and this plugin is specifically optimized to take full advantage of that speed.
2. WP Rocket (Premium - Best for Non-LiteSpeed Servers)
- Best for: Users on Apache/Nginx servers who want the easiest setup with maximum performance
- Price: Starting at $59/year
- Features: Page caching, cache preloading, GZIP compression, browser caching, database optimization
- BuddyPress Compatible: Yes, with automatic exclusions for dynamic content
- Link: WP Rocket Official Site
3. W3 Total Cache (Free)
- Best for: Advanced users on non-LiteSpeed servers who are comfortable with configuration
- Price: Free (Pro version available)
- Features: Page caching, object caching, database caching, minification, CDN integration
- BuddyPress Compatible: Yes, requires manual configuration
- Link: W3 Total Cache on WordPress.org
4. WP Super Cache (Free)
- Best for: Users on non-LiteSpeed servers who want simple, reliable caching
- Price: Free
- Features: Page caching, CDN support, cache preloading
- BuddyPress Compatible: Yes, with recommended settings
- Link: WP Super Cache on WordPress.org
Cache Configuration Best Practices
Follow these guidelines to ensure caching works properly with BeBuddy and BuddyPress:
Pages to Exclude from Caching
Always exclude these dynamic pages from caching:
- BuddyPress Pages: Activity, Members, Groups, Profile pages
- User-Specific Pages: My Account, Dashboard, Checkout (if using WooCommerce)
- Dynamic Content: Search results, login/registration pages
Important: Most caching plugins automatically detect and exclude BuddyPress pages. If you experience issues with logged-in users seeing cached content, check your cache exclusion settings.
Recommended Settings
- Enable Page Caching - Cache static HTML pages
- Enable Browser Caching - Store static files in users' browsers
- Enable GZIP Compression - Compress files before sending to browsers
- Disable Caching for Logged-In Users - Ensures dynamic content works properly
- Set Cache Expiration - 24 hours for most pages, shorter for frequently updated content
Object Caching (Advanced)
For high-traffic sites, consider implementing object caching with Redis or Memcached:
- What it does: Stores database query results in memory for faster retrieval
- Best for: Sites with 10,000+ members or high concurrent users
- Requirements: VPS or dedicated hosting with Redis/Memcached support
- Plugin: Redis Object Cache
Note: Object caching requires server-level configuration. Contact your hosting provider for assistance.
Testing Your Cache
After enabling caching, verify it's working:
- Log out of WordPress
- Visit your homepage in an incognito/private browser window
- Check the page source (right-click > View Page Source)
- Look for cache-related HTML comments (e.g., "Cached by WP Rocket" or "Performance optimized by W3 Total Cache")
- Test page load speed using GTmetrix or Google PageSpeed Insights
Common Questions
Image Optimization
Images are often the largest files on your site, making image optimization crucial for performance. Properly optimized images load faster without sacrificing visual quality.
Built-in Feature: BeBuddy already includes lazy loading, which delays loading images until they're visible in the viewport. This section focuses on compressing and converting images for optimal file sizes.
Recommended Plugin: CompressX
We recommend CompressX for image optimization. It's a powerful, user-friendly plugin that automatically compresses and converts images to modern formats.
Why CompressX?
- Automatic Compression - Compresses images on upload without manual intervention
- AVIF & WebP Conversion - Converts images to modern formats (AVIF up to 50% smaller than JPEG, WebP up to 30% smaller)
- Bulk Optimization - Optimize existing images in your media library
- Lossless & Lossy Options - Choose between maximum quality or maximum compression
- Free & Premium Versions - Free version covers most needs, premium adds advanced features
- CDN Integration - Works seamlessly with CDN services
Installing CompressX
- Go to wp-admin > Plugins > Add New
- Search for "CompressX"
- Click Install Now on the CompressX plugin
- Click Activate
Plugin Link: CompressX on WordPress.org
Recommended CompressX Settings
After installing CompressX, configure these settings at wp-admin > CompressX > Settings:
- Compression Level: Set to "Balanced" (good quality with significant size reduction)
- Enable AVIF & WebP Conversion: Turn this ON to automatically convert images to AVIF and WebP formats (AVIF recommended for best compression)
- Auto-Optimize on Upload: Enable to automatically compress new images
- Preserve Original Images: Keep this ON (allows you to restore originals if needed)
- Maximum Width/Height: Set reasonable limits (e.g., 2000px) to prevent unnecessarily large images
Bulk Optimize Existing Images
To optimize images already in your media library:
- Go to wp-admin > CompressX > Bulk Optimization
- Click Start Optimization
- Wait for the process to complete (this may take time for large libraries)
- Review the compression statistics
Modern Image Formats: AVIF & WebP
CompressX supports two modern image formats that provide superior compression compared to traditional JPEG and PNG:
AVIF (Recommended)
- Best Compression - 40-50% smaller than JPEG, 20-30% smaller than WebP
- Superior Quality - Better detail preservation and color accuracy
- Browser Support - Supported by all modern browsers (Chrome 85+, Firefox 93+, Safari 16+, Edge 121+)
- Automatic Fallback - CompressX serves WebP or JPEG/PNG to browsers that don't support AVIF
WebP (Widely Supported)
- Good Compression - 25-35% smaller than JPEG, 25-50% smaller than PNG
- Better Quality - Maintains visual quality at smaller file sizes
- Universal Support - Supported by all modern browsers
- Fallback Format - Used when AVIF isn't supported
Recommended: Enable both AVIF and WebP in CompressX. The plugin will serve AVIF to supported browsers, WebP as a fallback, and JPEG/PNG for older browsers. This ensures maximum compression with universal compatibility.
Note: BeBuddy fully supports AVIF and WebP images. Enable both formats in CompressX for the best results.
Image Optimization Best Practices
- Upload Appropriately Sized Images - Don't upload 5000px images if you only need 1200px
- Use the Right Format - Photos: AVIF/WebP/JPEG, Graphics/logos: AVIF/WebP/PNG, Animations: WebP/GIF
- Compress Before Upload - For best results, resize images before uploading
- Use Featured Images - WordPress generates multiple sizes automatically
- Avoid Over-Compression - Balance file size with visual quality
- Regular Audits - Periodically check for unoptimized images
Alternative Image Optimization Plugins
If CompressX doesn't meet your needs, consider these alternatives:
- ShortPixel - Free with monthly quota - Excellent compression, cloud-based processing, AVIF support
- Imagify - Free with monthly quota - User-friendly, automatic optimization, WebP support
- Smush - Free with premium option - Bulk optimization, lazy loading, WebP support
Lazy Loading (Already Built-in)
BeBuddy includes lazy loading by default, which means:
- Images only load when they're about to appear in the viewport
- Reduces initial page load time
- Saves bandwidth for users who don't scroll to the bottom
- No additional configuration needed
Already Optimized: You don't need to install a separate lazy loading plugin. BeBuddy handles this automatically.
Common Questions
CDN Integration
A Content Delivery Network (CDN) delivers your site's static files (images, CSS, JavaScript) from servers located closer to your visitors, dramatically reducing load times and improving global performance.
What is a CDN and Why Use It?
A CDN is a network of servers distributed worldwide that cache and serve your static content:
Benefits of Using a CDN
- Faster Load Times - Content is served from the nearest server to your visitor
- Reduced Server Load - Static files are served by the CDN, not your hosting server
- Better Global Performance - Visitors from around the world experience similar speeds
- Improved Reliability - If one CDN server fails, another takes over automatically
- Bandwidth Savings - Reduces bandwidth usage on your hosting account
- DDoS Protection - Many CDNs include security features to protect against attacks
Recommended CDN Providers
Choose a CDN provider based on your budget and needs:
1. Cloudflare (Free - Recommended for Most Users)
- Best for: Everyone, especially those starting out
- Price: Free plan available, paid plans from $20/month
- Features: Global CDN, DDoS protection, SSL certificate, caching, firewall, analytics
- Ease of Setup: Very easy - change nameservers and you're done
- Link: Cloudflare Official Site
Recommended: Cloudflare's free plan is excellent for most BeBuddy sites. It includes unlimited bandwidth, global CDN, and SSL certificate at no cost.
2. BunnyCDN (Affordable Pay-As-You-Go)
- Best for: Users who want predictable, low-cost pricing
- Price: Pay-as-you-go, starting at $1/month for 1TB bandwidth
- Features: Global CDN, video streaming, image optimization, storage zones
- Ease of Setup: Moderate - requires plugin configuration
- Link: BunnyCDN Official Site
3. StackPath (Premium)
- Best for: High-traffic sites needing advanced features
- Price: Starting at $10/month
- Features: Global CDN, WAF, DDoS protection, edge computing
- Ease of Setup: Moderate - requires plugin configuration
- Link: StackPath Official Site
4. KeyCDN (Developer-Friendly)
- Best for: Developers who want granular control
- Price: Pay-as-you-go, starting at $0.04/GB
- Features: Global CDN, HTTP/2, Brotli compression, real-time analytics
- Ease of Setup: Moderate - requires plugin configuration
- Link: KeyCDN Official Site
Setting Up Cloudflare (Recommended)
Cloudflare is the easiest CDN to set up and offers the best free plan. Follow these steps:
Step 1: Create a Cloudflare Account
- Go to Cloudflare.com
- Click Sign Up
- Enter your email and create a password
- Click Create Account
Step 2: Add Your Site
- Click Add a Site
- Enter your domain name (e.g., yourdomain.com)
- Click Add Site
- Select the Free plan
- Click Continue
Step 3: Review DNS Records
- Cloudflare will scan your existing DNS records
- Review the records to ensure they're correct
- Click Continue
Step 4: Change Nameservers
- Cloudflare will provide you with two nameservers (e.g.,
ns1.cloudflare.comandns2.cloudflare.com) - Log in to your domain registrar (where you bought your domain)
- Find the nameserver settings (usually under DNS or Domain Management)
- Replace your current nameservers with Cloudflare's nameservers
- Save the changes
Important: Nameserver changes can take up to 24 hours to propagate, though they usually complete within a few hours.
Step 5: Configure Cloudflare Settings
Once your nameservers are updated, configure these recommended settings in Cloudflare:
- Go to SSL/TLS and set encryption mode to Full (Strict)
- Go to Speed > Optimization and enable:
- Auto Minify (CSS, JavaScript, HTML)
- Brotli compression
- Rocket Loader (optional - test with your site)
- Go to Caching > Configuration and set:
- Caching Level: Standard
- Browser Cache TTL: 4 hours (or higher)
- Go to Network and enable:
- HTTP/2
- HTTP/3 (with QUIC)
Setting Up Other CDN Providers
For BunnyCDN, StackPath, or KeyCDN, you'll need a WordPress CDN plugin:
Recommended Plugin: CDN Enabler
- Go to wp-admin > Plugins > Add New
- Search for "CDN Enabler"
- Click Install Now and then Activate
- Go to Settings > CDN Enabler
- Enter your CDN URL (provided by your CDN provider)
- Configure included file types (images, CSS, JavaScript)
- Click Save Changes
Note: Each CDN provider has specific setup instructions. Refer to their documentation for detailed configuration steps.
CDN Best Practices
- Enable HTTPS - Always use SSL/TLS encryption with your CDN
- Configure Caching Rules - Set appropriate cache expiration times for different file types
- Exclude Dynamic Content - Don't cache BuddyPress pages, login pages, or user-specific content
- Monitor Performance - Use CDN analytics to track bandwidth usage and performance gains
- Clear Cache When Needed - Purge CDN cache after making design changes or updates
- Test Thoroughly - Verify all site features work correctly after enabling CDN
Verifying CDN is Working
To confirm your CDN is active:
- Visit your website
- Right-click on an image and select Inspect or Inspect Element
- Look at the image URL - it should show your CDN domain (e.g.,
cdn.yourdomain.comor Cloudflare's domain) - Check the response headers for CDN-specific headers (e.g.,
cf-cache-statusfor Cloudflare) - Use online tools like WebPageTest to verify CDN delivery
Common Questions
Frequently Asked Questions
Common questions about BeBuddy theme setup, features, and customization.
The easiest way to display ads is using widget areas. BeBuddy includes multiple widget areas (sidebar, footer, member profiles, etc.) where you can place ad widgets.
Recommended Ad Plugins (Free):
- Ad Inserter - Free - Most popular, supports widget areas, automatic ad placement, and advanced targeting
- Advanced Ads - Free - User-friendly, widget support, ad rotation, and visitor conditions
- AdRotate - Free - Simple ad rotation, widget support, and scheduling
To add ads via widget areas:
- Install and activate your chosen ad plugin
- Create your ad in the plugin (paste your ad code)
- Go to wp-admin > Appearance > Widgets
- Find the widget area where you want to display ads (e.g., "Sidebar", "Footer", "Member Profile Left")
- Add the ad plugin's widget to that area
- Configure the widget settings and save
Tip: Ad Inserter is recommended for its flexibility and widget area support. It also allows automatic ad placement before/after content without coding.
Source & Credits
Images:
- Pexels - https://www.pexels.com/
- Unsplash - https://unsplash.com/
- Pixabay - https://pixabay.com/
Fonts:
- Google Fonts - http://fonts.google.com/
Plugins & Scripts:
- Redux Framework Team - https://redux.io/
- CMB2 Contributors - https://github.com/CMB2/CMB2/graphs/contributors
- Bootstrap 5 - http://getbootstrap.com/
- Swiper JS - https://swiperjs.com/
- Owl Carousel - https://owlcarousel2.github.io/OwlCarousel2/
- Select 2 - https://select2.org/
- Magnific Popup - https://dimsemenov.com/plugins/magnific-popup/
- Malihu - https://manos.malihu.gr/jquery-custom-content-scroller/
- Sticky Kit - https://leafo.net/sticky-kit/
- Documentation - https://themeforest.net/user/harnishdesign
Support
We're here to help! Get assistance with BeBuddy theme-related issues through our dedicated support channels.
How to Get Support
If this documentation doesn't answer your questions, please contact us through the item support page:
Response Time
We are committed to providing timely support:
- Response Time: Maximum 24 hours on weekdays
- Time Zone: GMT +5:30
- Holidays: Response times may be longer during holiday seasons
What's Covered
Our support includes:
- Bug Fixes: Issues with theme functionality
- Installation Help: Assistance with theme setup and demo import
- Configuration Guidance: Help with theme options and settings
- Compatibility Issues: Problems with recommended plugins
- Documentation Clarification: Questions about theme features
What's Not Covered
Important: Support is available to verified buyers only and covers theme-related issues. The following are not included:
- Custom code modifications or development
- Third-party plugin customization
- Server configuration or hosting issues
- WordPress core functionality questions
- General WordPress training
Before Contacting Support
To help us assist you faster, please:
- Check this documentation thoroughly
- Search the FAQs section
- Verify you're using the latest version of BeBuddy
- Test with all plugins disabled (except required ones)
- Check if the issue occurs with a default WordPress theme
When Submitting a Support Request
Please include the following information:
- WordPress version
- BeBuddy theme version
- List of active plugins
- Detailed description of the issue
- Screenshots or screen recordings (if applicable)
- Steps to reproduce the problem
- URL to the page where the issue occurs (if applicable)
Tip: Providing detailed information helps us resolve your issue faster. The more context you provide, the quicker we can assist you.
Other products
Check Our Other Products
Changelog
See what's new added, changed, fixed, improved or updated in the latest versions.
Version 1.1.0 (22 Apr, 2026)
- Added WMPL support for the theme
- Added a custom language switcher drowpdown in the header for WMPL plugin
- Added "View All" links to global header search results
- Updated Some minor changes
Version 1.0.0 (22 Jan, 2026)
Initial Release